


Contact our support team for more information.
A Mapping Configuration is Guardian’s memory for your firm’s standards. When a Company or Project Administrator uses Model Properties to convert, or “map,” incoming Revit properties to those in the active project model, the Mapping Configuration stores and remembers those rules, or “Mapping Rules” – making them available for automatic mapping for every project that uses that configuration.
Think of Mapping Configurations as reusable rule sets: you build them once, assign them to projects, and Guardian applies the rules automatically every time content is loaded.
Mapping Configurations work in conjunction with Model Properties and Transactions. Think of Model Properties as the engine for executing mappings. Transactions are the signal for Guardian to automatically launch Model Properties for incoming content. Mapping Configurations are the keys to the engine and its memory system.
Note: Model Properties and any of its tangential features will not operate without a Mapping Configuration assigned to the model.
Guardian does not include any pre-loaded Mapping Configuration files. They must be created by a Company Administrator. It is recommended to start with three configurations:
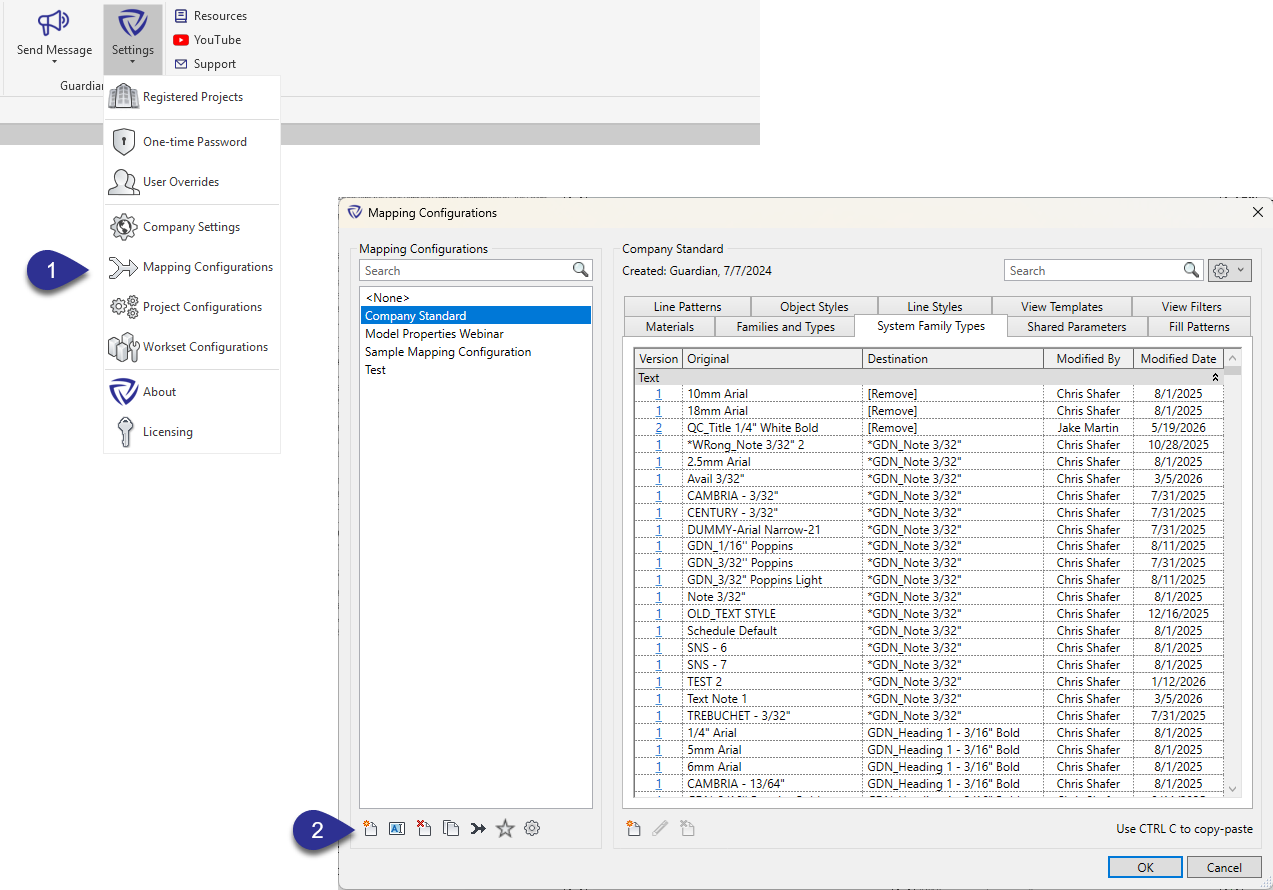
The other buttons in the window allow you to Rename, Delete, Duplicate, or Merge existing configurations.
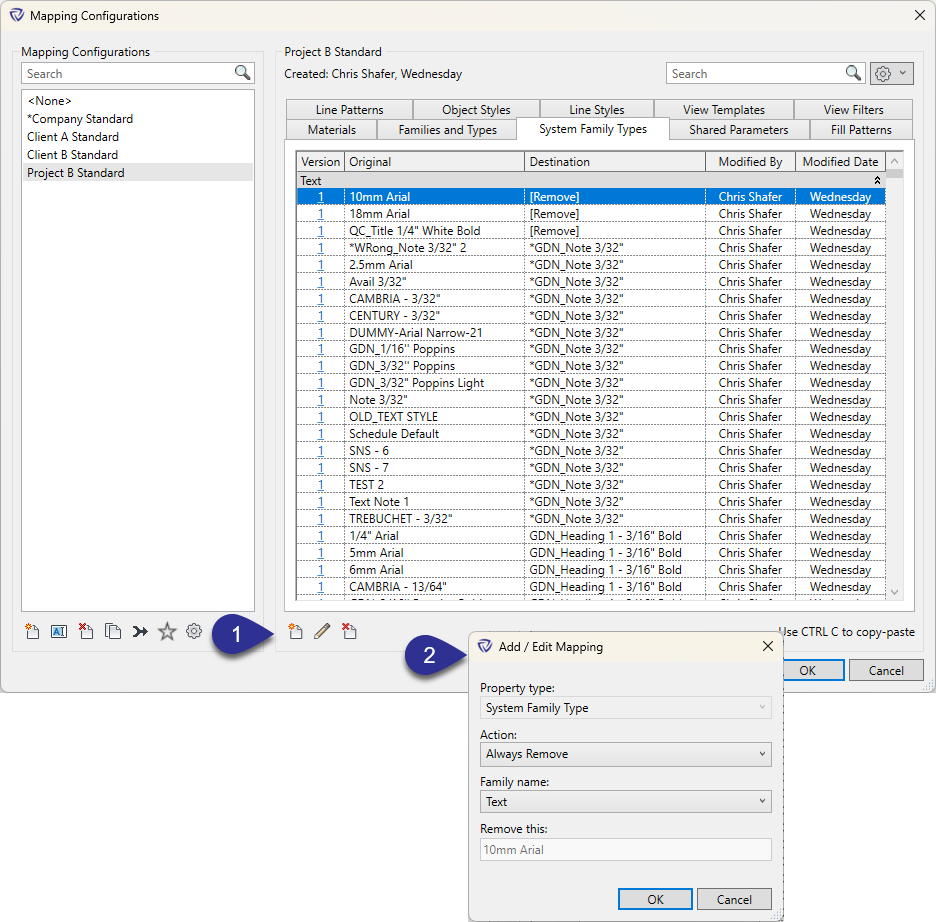
Mapping rules can be created and modified within the Mapping Configurations dialog.
Pro Tip: While Mappings can be created within the Mapping Configuration dialog, it is highly recommended to perform all mappings within the Model Properties or Incoming Properties dialogs as the UI is specifically designed to perform these mappings effectively and within context.
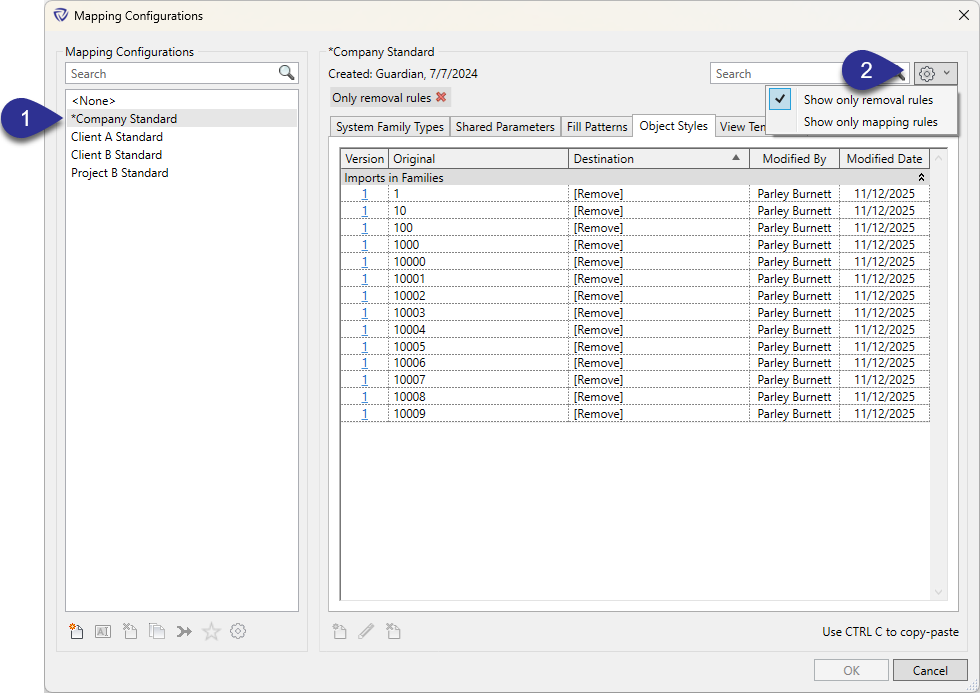
In the Mapping Configurations dialog, mapping rules can be filtered to show only removals or only mappings.
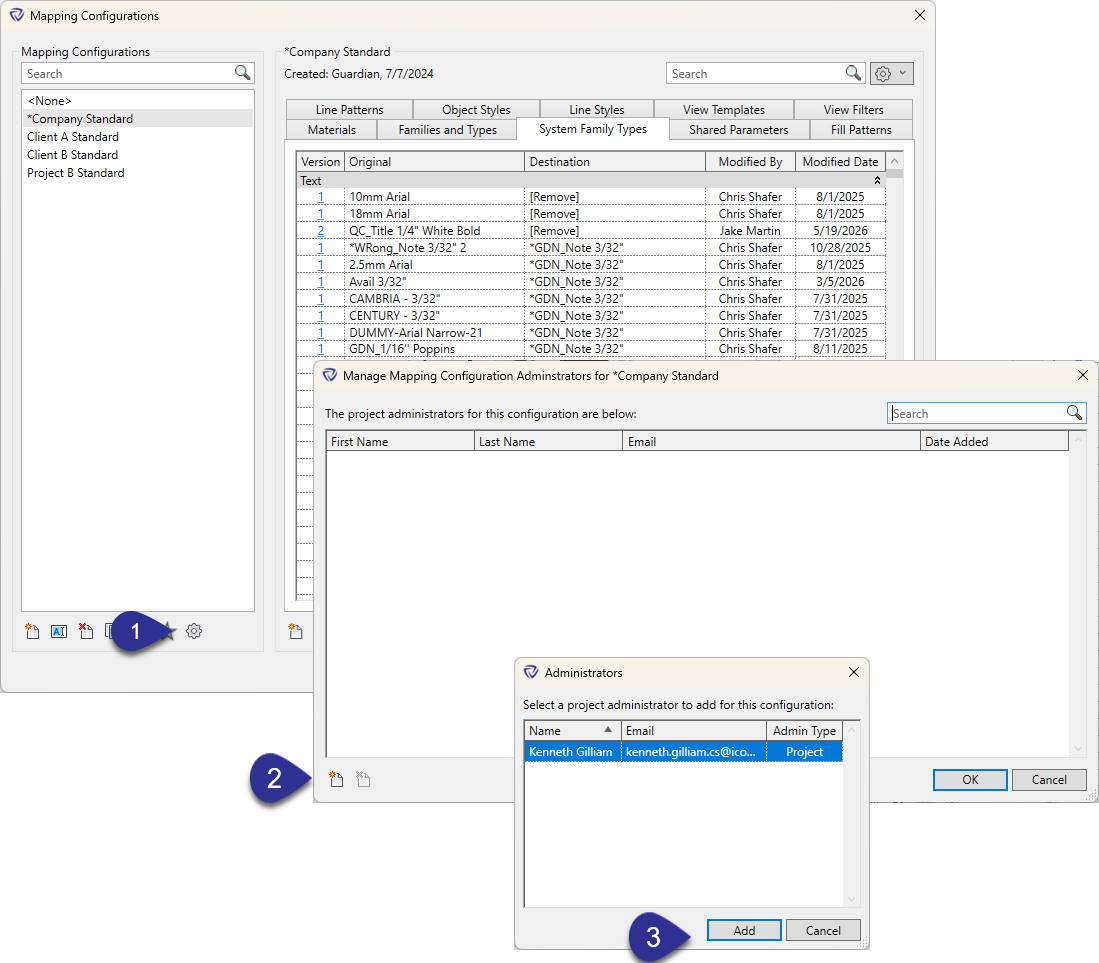
Project Administrators must be assigned to a Mapping Configuration for them to execute full mappings (or memorized mappings) on the model they are assigned. Otherwise, any mapping performed by a Project Administrator will only be a One-Time Mapping. Company Administrators will always be able to perform full mappings.
A Mapping Configuration can be applied automatically whenever a new model is registered with Guardian. This is the recommended approach to ensure Guardian functions correctly from the moment a model is registered.
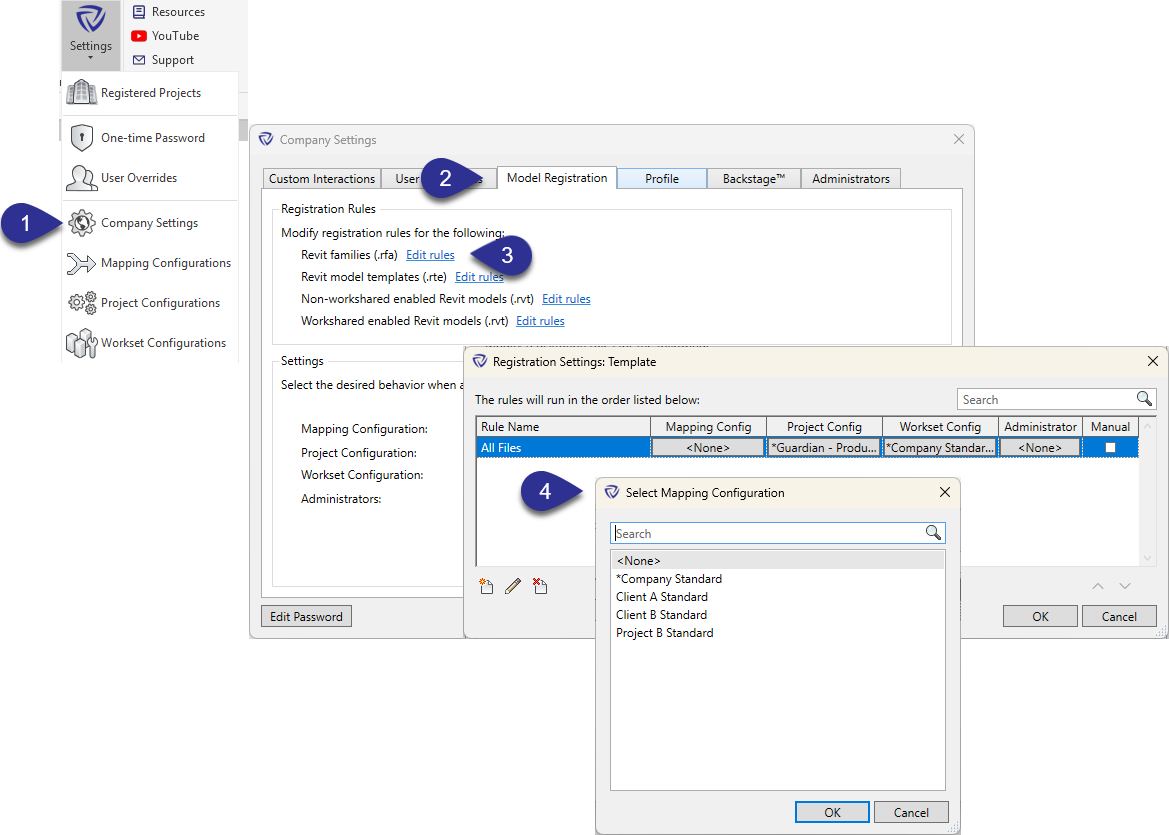
To set the Mapping Configuration assigned for all newly registered models:
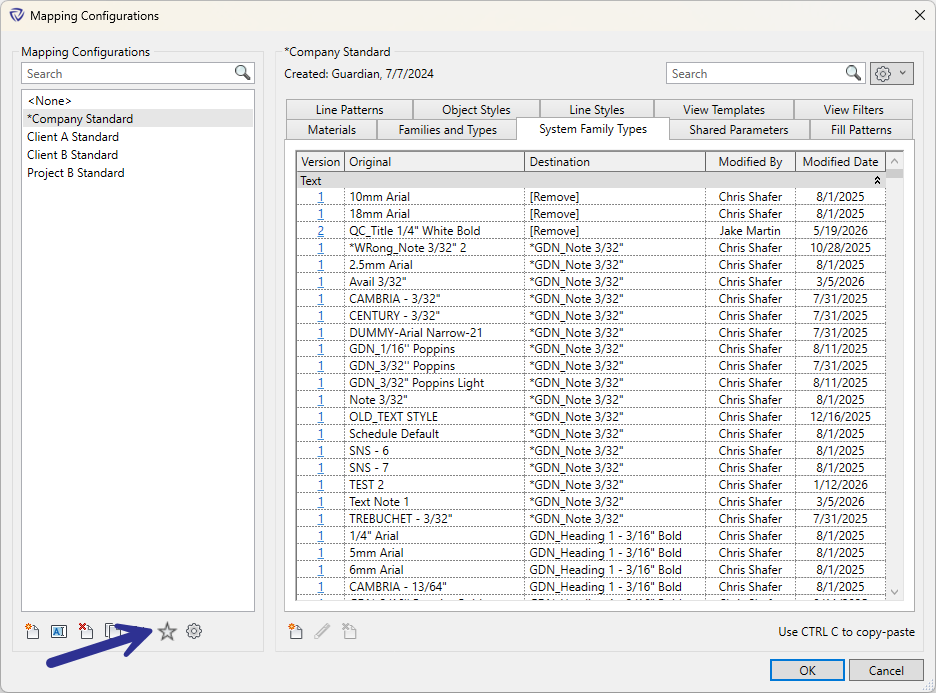
Note: A default Mapping Configuration can also be assigned from the Mapping Configurations dialog (Settings > Mapping Configurations). Clicking the Star button will assign that Mapping Configuration to all new projects in which a Mapping Configuration has not been assigned as part of the Model Registration rules.
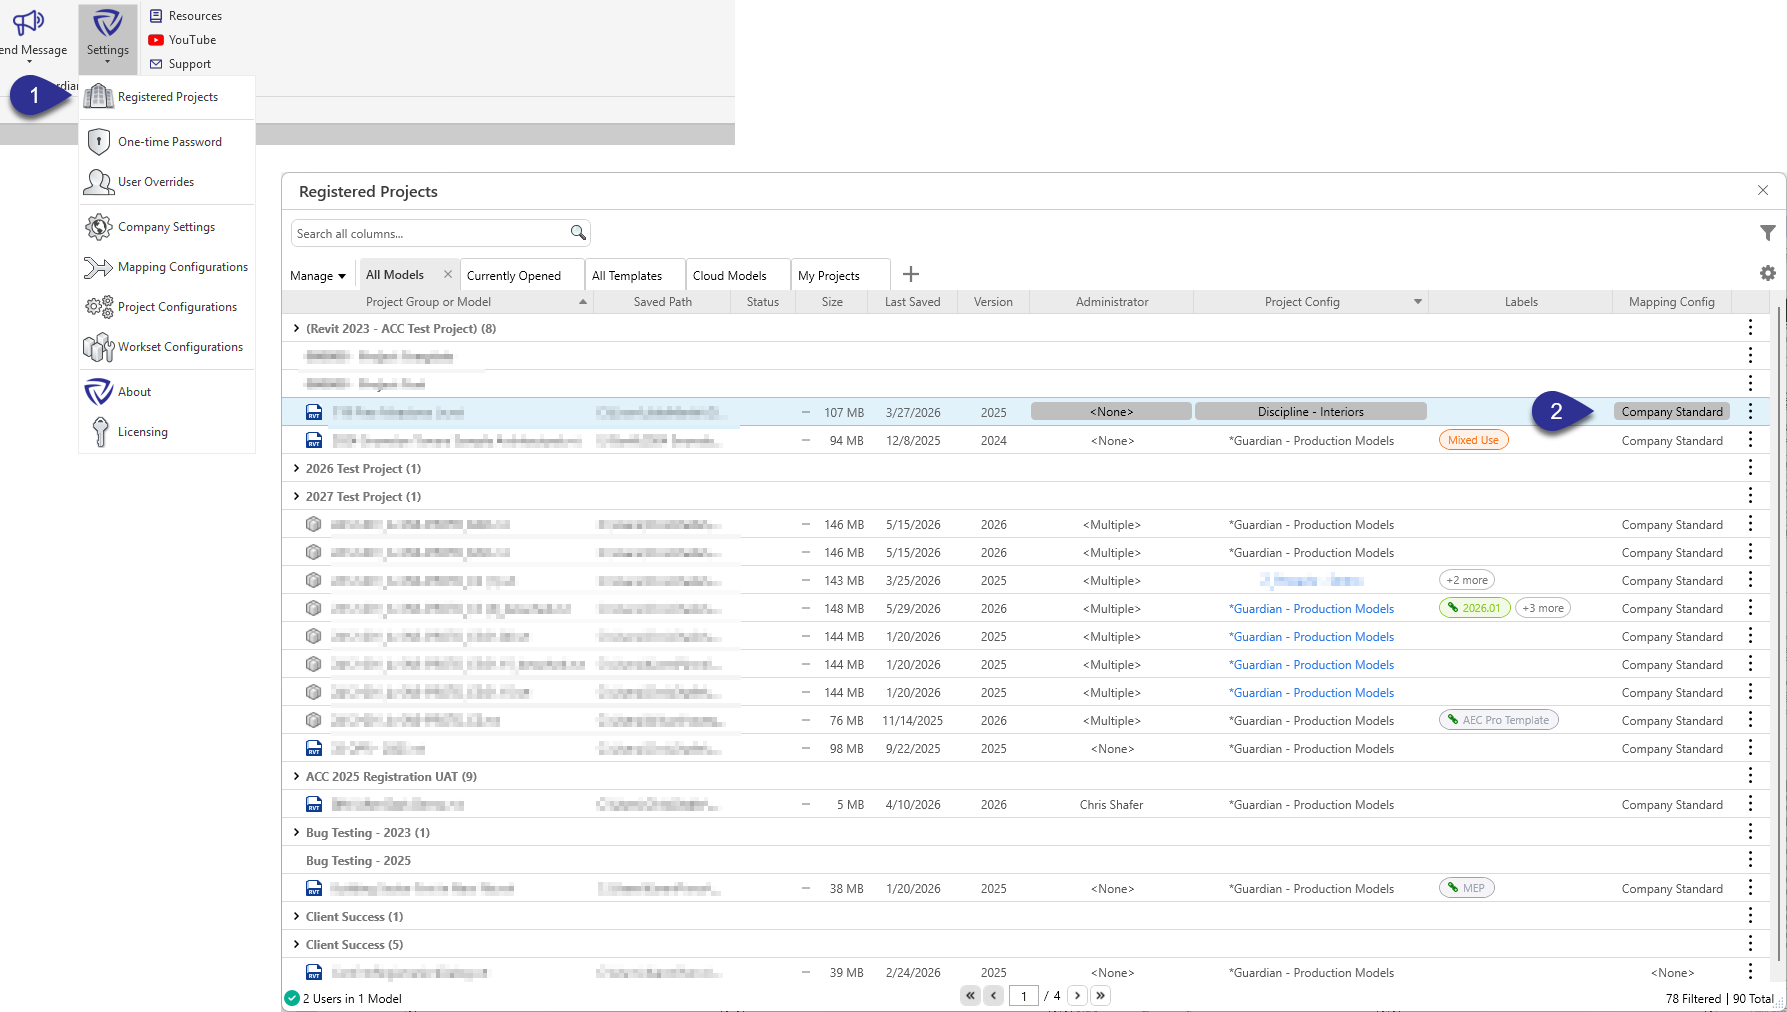
The Mapping Configuration assigned to an already-registered model can be changed at any time.
In beta
Guardian Link lets one company, the Primary Project Team, keep its Guardian standards and protections in force on a model while other companies, Linked Collaborators, work in it. On a Linked model, the Primary’s Mapping Configuration applies to everyone working in the model. Model Properties and Incoming Properties use the Primary’s mapping rules for every user, whatever company they belong to.
In Mapping Configurations, Mapping Configurations are grouped by the company they belong to:
These apply to every Linked Collaborator user, including Company Administrators and Project Administrators:
There’s one way a Linked Collaborator can add to the Primary’s rules: through Incoming Properties. Transactions are part of the Primary’s Project Configuration, so the Primary’s Transactions settings decide what Linked Collaborator users see when content is loaded into the model. If the model has Model Overrides for Transactions, those take precedence over the Project Configuration. The Primary’s own administrators always see the Incoming Properties dialog.
When a Transaction is set to Show Dialogs (full mappings), rules a Linked Collaborator adds are saved to the Primary’s Mapping Configuration. They apply to every model that configuration is assigned to, not just the Linked model, and they stay in the configuration if the Link ends.
To keep full control of your mapping rules, set your Transactions to Silent Mode or Show Dialogs (one-time mappings) before enabling the Link, and check whether the model has Model Overrides for Transactions or assign the Linked model its own Client/Project Standards Mapping Configuration.
Having Linked Collaborators doesn’t change how you manage your own Mapping Configurations. Your Company and Project Administrators can create, edit, and assign them as usual.
If the Primary ends the Link, every company goes back to the Mapping Configuration its model had before the Link. A session that’s already open picks up the change the next time the model is opened.
Mapping rules a Linked Collaborator added through Incoming Properties stay in the Primary’s Mapping Configuration.
Contact our support team for more information.
A Mapping Configuration is Guardian’s memory for your firm’s standards. When a Company or Project Administrator uses Model Properties to convert, or “map,” incoming Revit properties to those in the active project model, the Mapping Configuration stores and remembers those rules, or “Mapping Rules” – making them available for automatic mapping for every project that uses that configuration.
Think of Mapping Configurations as reusable rule sets: you build them once, assign them to projects, and Guardian applies the rules automatically every time content is loaded.
Mapping Configurations work in conjunction with Model Properties and Transactions. Think of Model Properties as the engine for executing mappings. Transactions are the signal for Guardian to automatically launch Model Properties for incoming content. Mapping Configurations are the keys to the engine and its memory system.
Note: Model Properties and any of its tangential features will not operate without a Mapping Configuration assigned to the model.
Guardian does not include any pre-loaded Mapping Configuration files. They must be created by a Company Administrator. It is recommended to start with three configurations:
The other buttons in the window allow you to Rename, Delete, Duplicate, or Merge existing configurations.
Mapping rules can be created and modified within the Mapping Configurations dialog.
Pro Tip: While Mappings can be created within the Mapping Configuration dialog, it is highly recommended to perform all mappings within the Model Properties or Incoming Properties dialogs as the UI is specifically designed to perform these mappings effectively and within context.
In the Mapping Configurations dialog, mapping rules can be filtered to show only removals or only mappings.
Project Administrators must be assigned to a Mapping Configuration for them to execute full mappings (or memorized mappings) on the model they are assigned. Otherwise, any mapping performed by a Project Administrator will only be a One-Time Mapping. Company Administrators will always be able to perform full mappings.
A Mapping Configuration can be applied automatically whenever a new model is registered with Guardian. This is the recommended approach to ensure Guardian functions correctly from the moment a model is registered.
To set the Mapping Configuration assigned for all newly registered models:
Note: A default Mapping Configuration can also be assigned from the Mapping Configurations dialog (Settings > Mapping Configurations). Clicking the Star button will assign that Mapping Configuration to all new projects in which a Mapping Configuration has not been assigned as part of the Model Registration rules.
The Mapping Configuration assigned to an already-registered model can be changed at any time.
In beta
Guardian Link lets one company, the Primary Project Team, keep its Guardian standards and protections in force on a model while other companies, Linked Collaborators, work in it. On a Linked model, the Primary’s Mapping Configuration applies to everyone working in the model. Model Properties and Incoming Properties use the Primary’s mapping rules for every user, whatever company they belong to.
In Mapping Configurations, Mapping Configurations are grouped by the company they belong to:
These apply to every Linked Collaborator user, including Company Administrators and Project Administrators:
There’s one way a Linked Collaborator can add to the Primary’s rules: through Incoming Properties. Transactions are part of the Primary’s Project Configuration, so the Primary’s Transactions settings decide what Linked Collaborator users see when content is loaded into the model. If the model has Model Overrides for Transactions, those take precedence over the Project Configuration. The Primary’s own administrators always see the Incoming Properties dialog.
When a Transaction is set to Show Dialogs (full mappings), rules a Linked Collaborator adds are saved to the Primary’s Mapping Configuration. They apply to every model that configuration is assigned to, not just the Linked model, and they stay in the configuration if the Link ends.
To keep full control of your mapping rules, set your Transactions to Silent Mode or Show Dialogs (one-time mappings) before enabling the Link, and check whether the model has Model Overrides for Transactions or assign the Linked model its own Client/Project Standards Mapping Configuration.
Having Linked Collaborators doesn’t change how you manage your own Mapping Configurations. Your Company and Project Administrators can create, edit, and assign them as usual.
If the Primary ends the Link, every company goes back to the Mapping Configuration its model had before the Link. A session that’s already open picks up the change the next time the model is opened.
Mapping rules a Linked Collaborator added through Incoming Properties stay in the Primary’s Mapping Configuration.
Contact our support team to receive personalized assistance.
