


Contact our support team for more information.
Guardian Sync Properties™ allows administrators to centrally manage company standard Revit properties in the cloud and keep them synchronized across all registered models. Rather than maintaining properties inside template or container files, properties are stored in the cloud and made available to any project – regardless of Revit version.
Key capabilities:
Note: Uploading properties requires an open registered model that contains the properties you want to store in the cloud. Company Administrator access is required to upload, manage, and configure sync settings. End users can download cloud properties into their active model, but cannot upload.
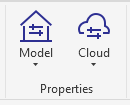
Guardian Sync Properties operates through two complementary interfaces, both accessible from the Revit ribbon. Understanding the difference between them is the foundation for working with Guardian Sync Properties effectively.
Think of these as mirror images of each other. Model Properties is the upload interface and shows all properties in the active model; Cloud Properties is the download interface and shows all properties hosted in the cloud.
Pro Tip: When uploading a firm’s standard Revit properties to the cloud, start with a cleaned Revit Project Template (using Model Properties to clean the template first) or a content container.
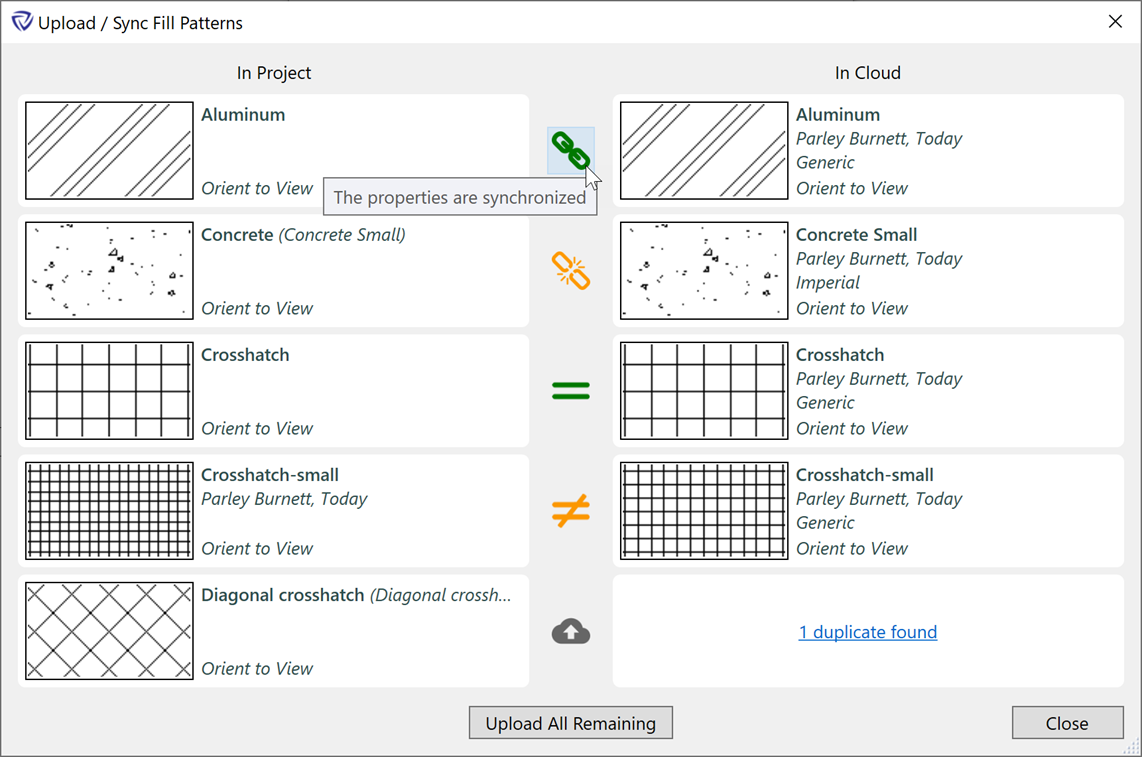
Sync status icons appear throughout the upload dialog and property panels. Because you will encounter them during the upload process and when managing cloud properties, it helps to understand what each one means before getting started.
| Icon | Meaning |
|---|---|
 |
Property is synchronized with the corresponding cloud property |
 |
Property is out of sync with the corresponding cloud property |
 |
Property name and contents match the corresponding cloud property |
 |
Property name matches but settings differ from the corresponding cloud property |
 |
Property is available to be uploaded to the cloud |
Note: For admins, these icons are clickable actions that allow you to modify or fix the relationship indicated. End-users see these icons as indicators only.
It is not possible to have multiple properties in the cloud with the same name. When a name conflict exists, it must be resolved individually — it cannot be handled by bulk upload actions.
The initial upload should be performed from your firm’s Revit template or master container file that contains all of your company standard properties. Before uploading, it is strongly recommended to use Guardian’s Model Properties dialog to clean the template or container file down to only firm-approved standards. Uploading before cleaning risks pushing non-standard properties into the cloud.
Pro Tip: Cloud properties are Revit-version independent. There is no need to upload the same property from multiple Revit versions.
Because many Revit properties are nested within others, the order in which you upload matters. Uploading in the wrong order may result in nested properties not being recognized as already in the cloud when their parent property is uploaded.
Upload Revit properties in the following order:
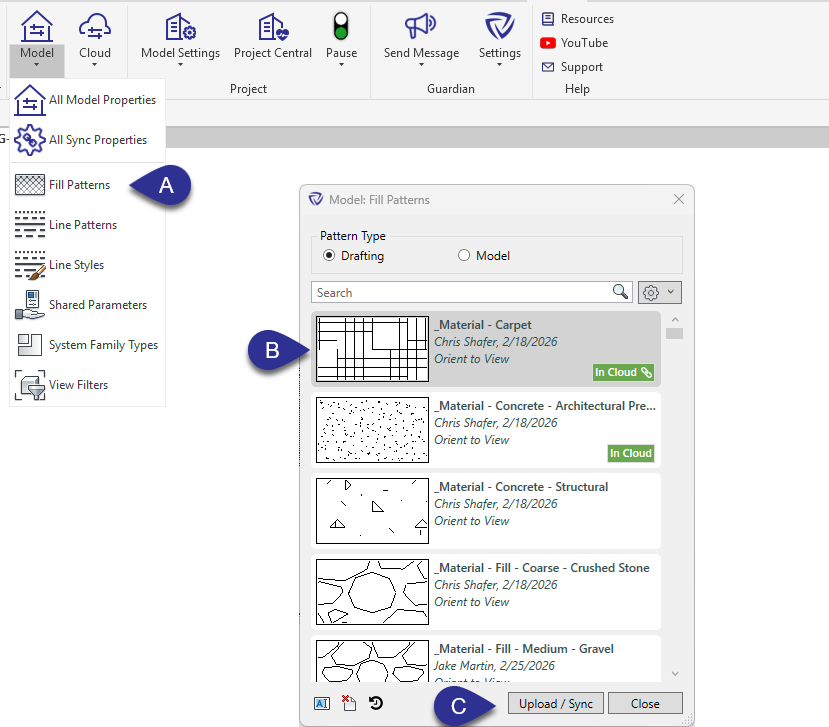
1. Open a registered model that contains the company standard properties you want to upload
2. Expand the Model dropdown and select the desired property type (A) (e.g., Fill Patterns, Line Patterns, Line Styles)
3. Select one or more properties to upload (B). Use Shift to select a range or Ctrl to select individually
4. Click Upload/Sync (C)
5. Within the Upload/Sync dialog, you have two options:
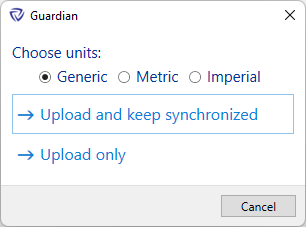
6. When uploading a property for the first time, you will be prompted with three options
7. Once a property is uploaded, an In Cloud icon appears next to it in the property dialog. The property is now stored in the cloud and can be downloaded into any registered model by both admins and end-users
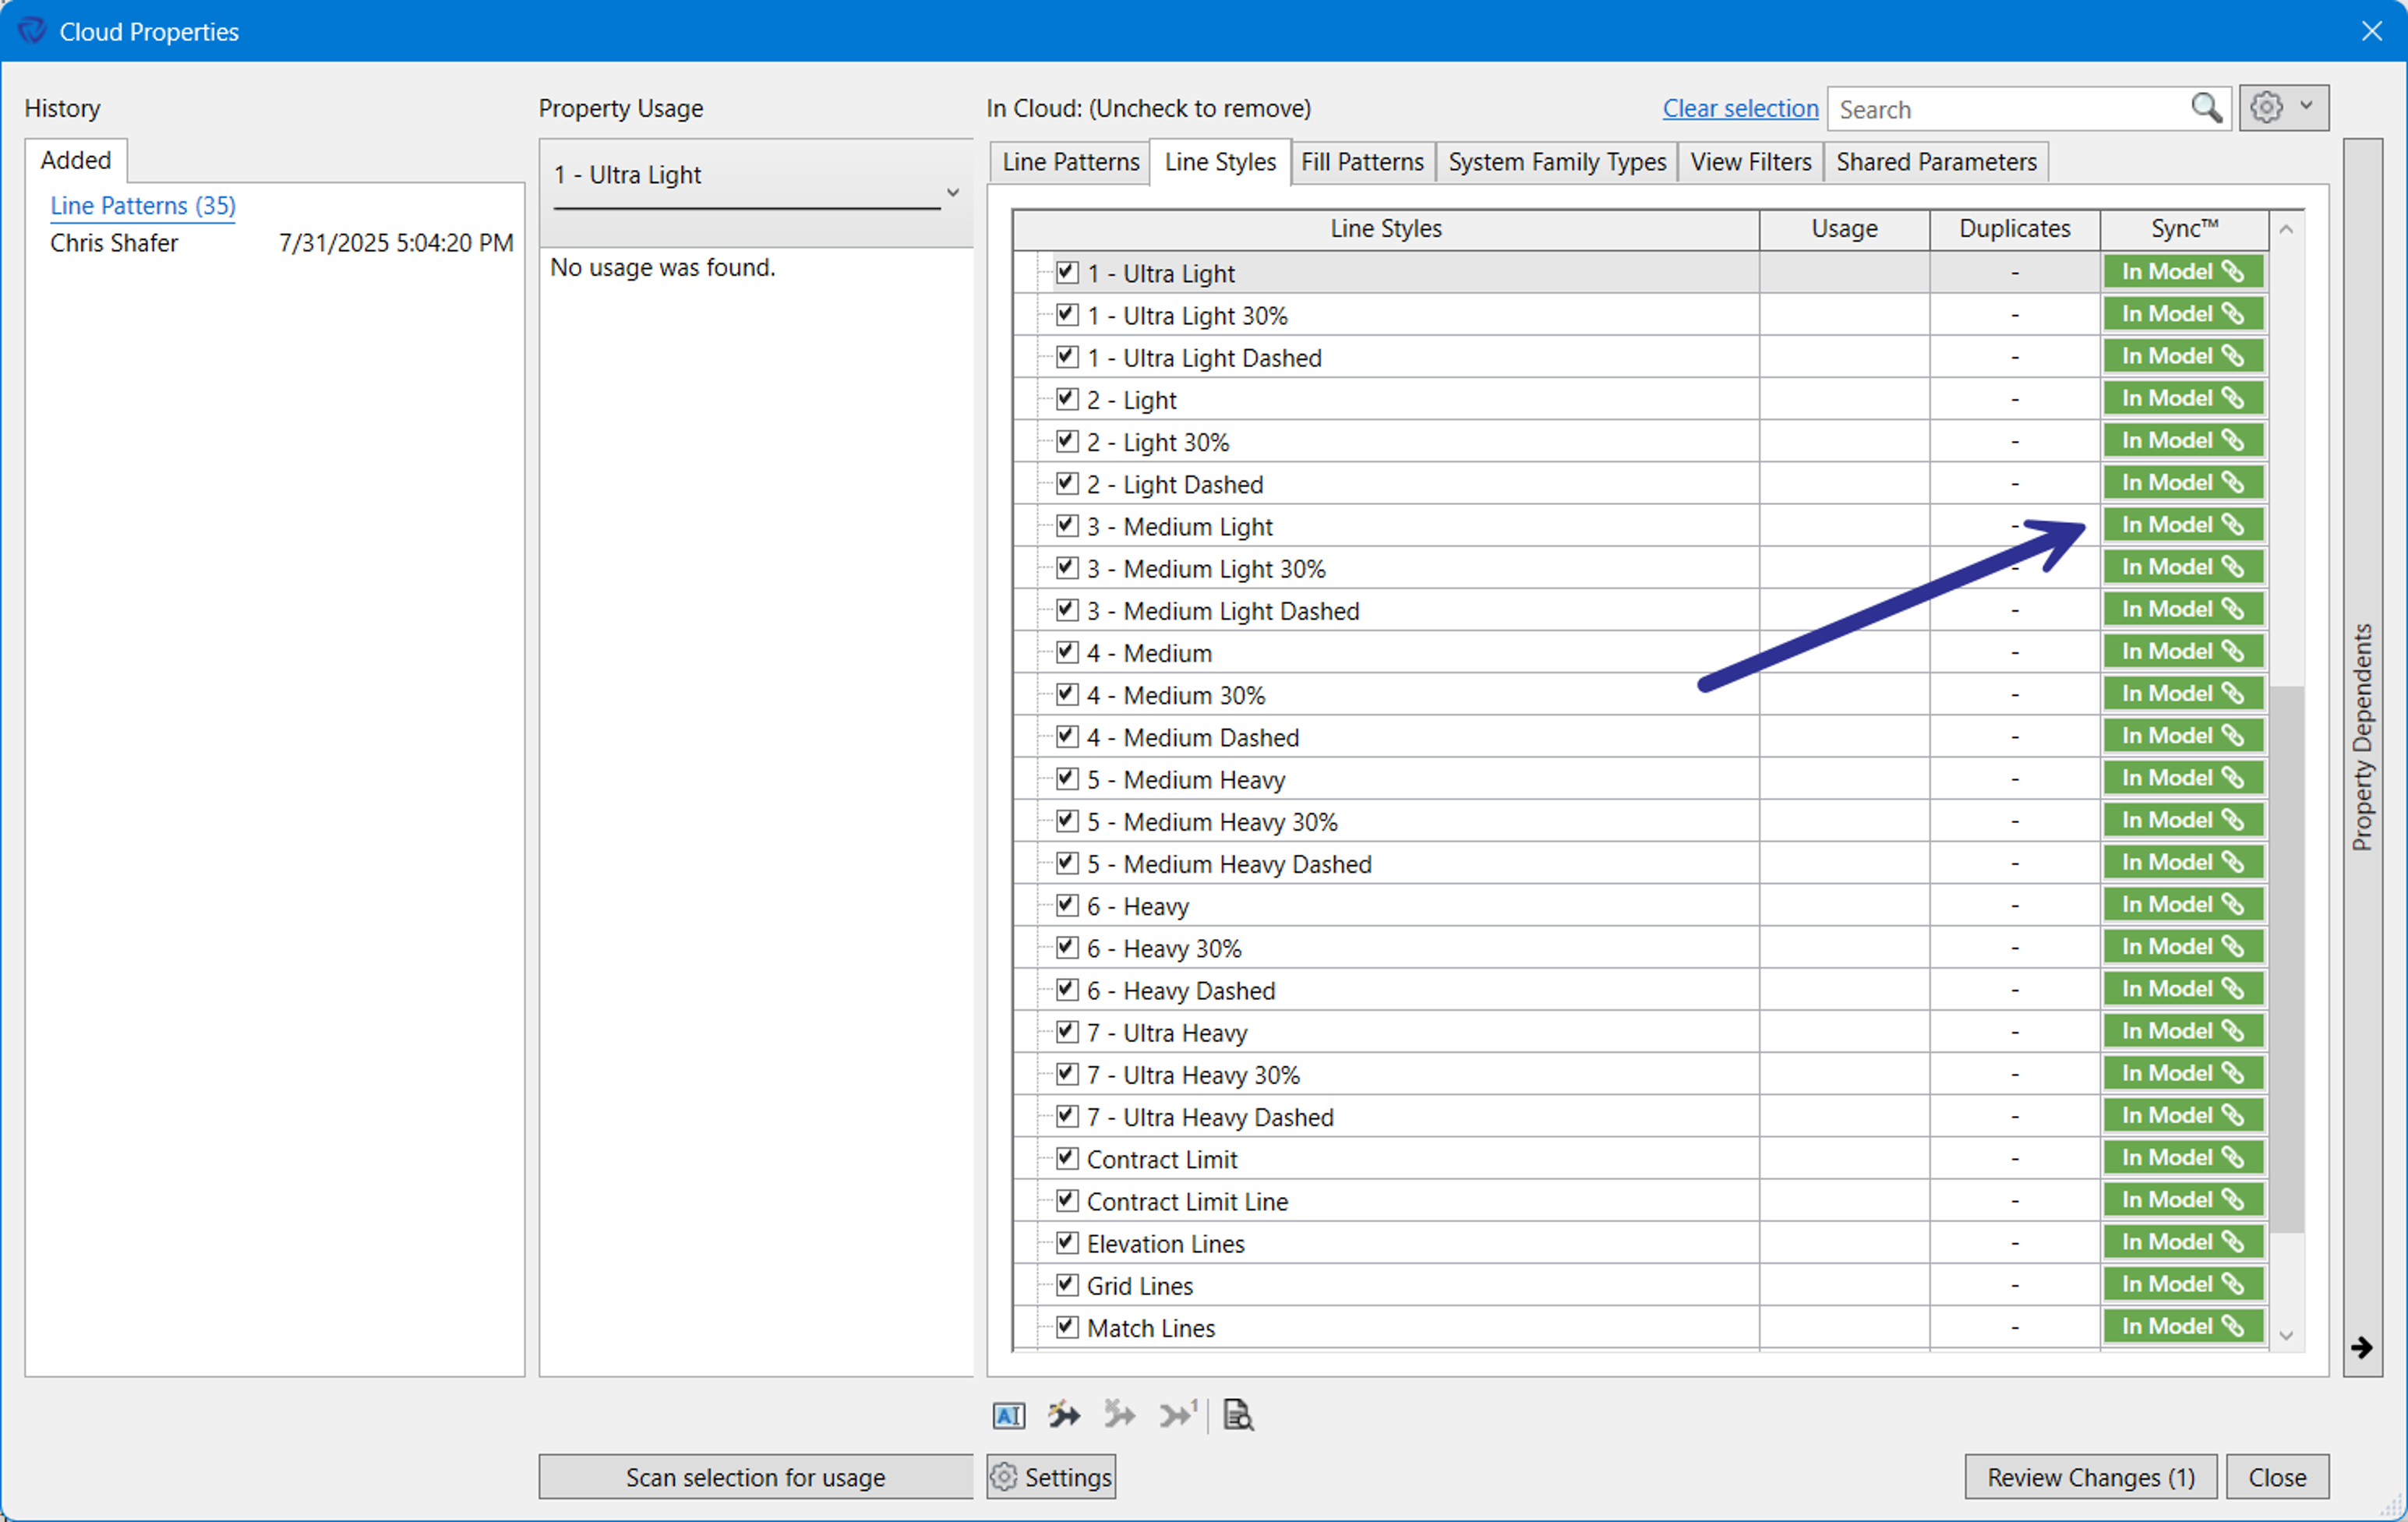
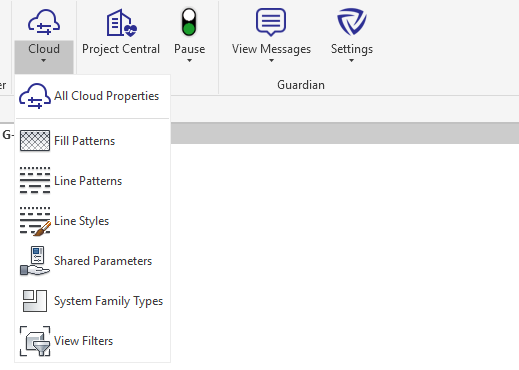
There are multiple ways to view all properties in the cloud. The All Cloud Properties provides a comprehensive tabular view of all the properties. While the individual properties types can be viewed on a detail level and compared with other properties of the same type.
To view and manage all properties stored in the cloud, click the Cloud icon in the Guardian ribbon, or All Cloud Properties from the Cloud dropdown.
The All Cloud Properties dialog provides multiple functions for maintaining cloud properties:
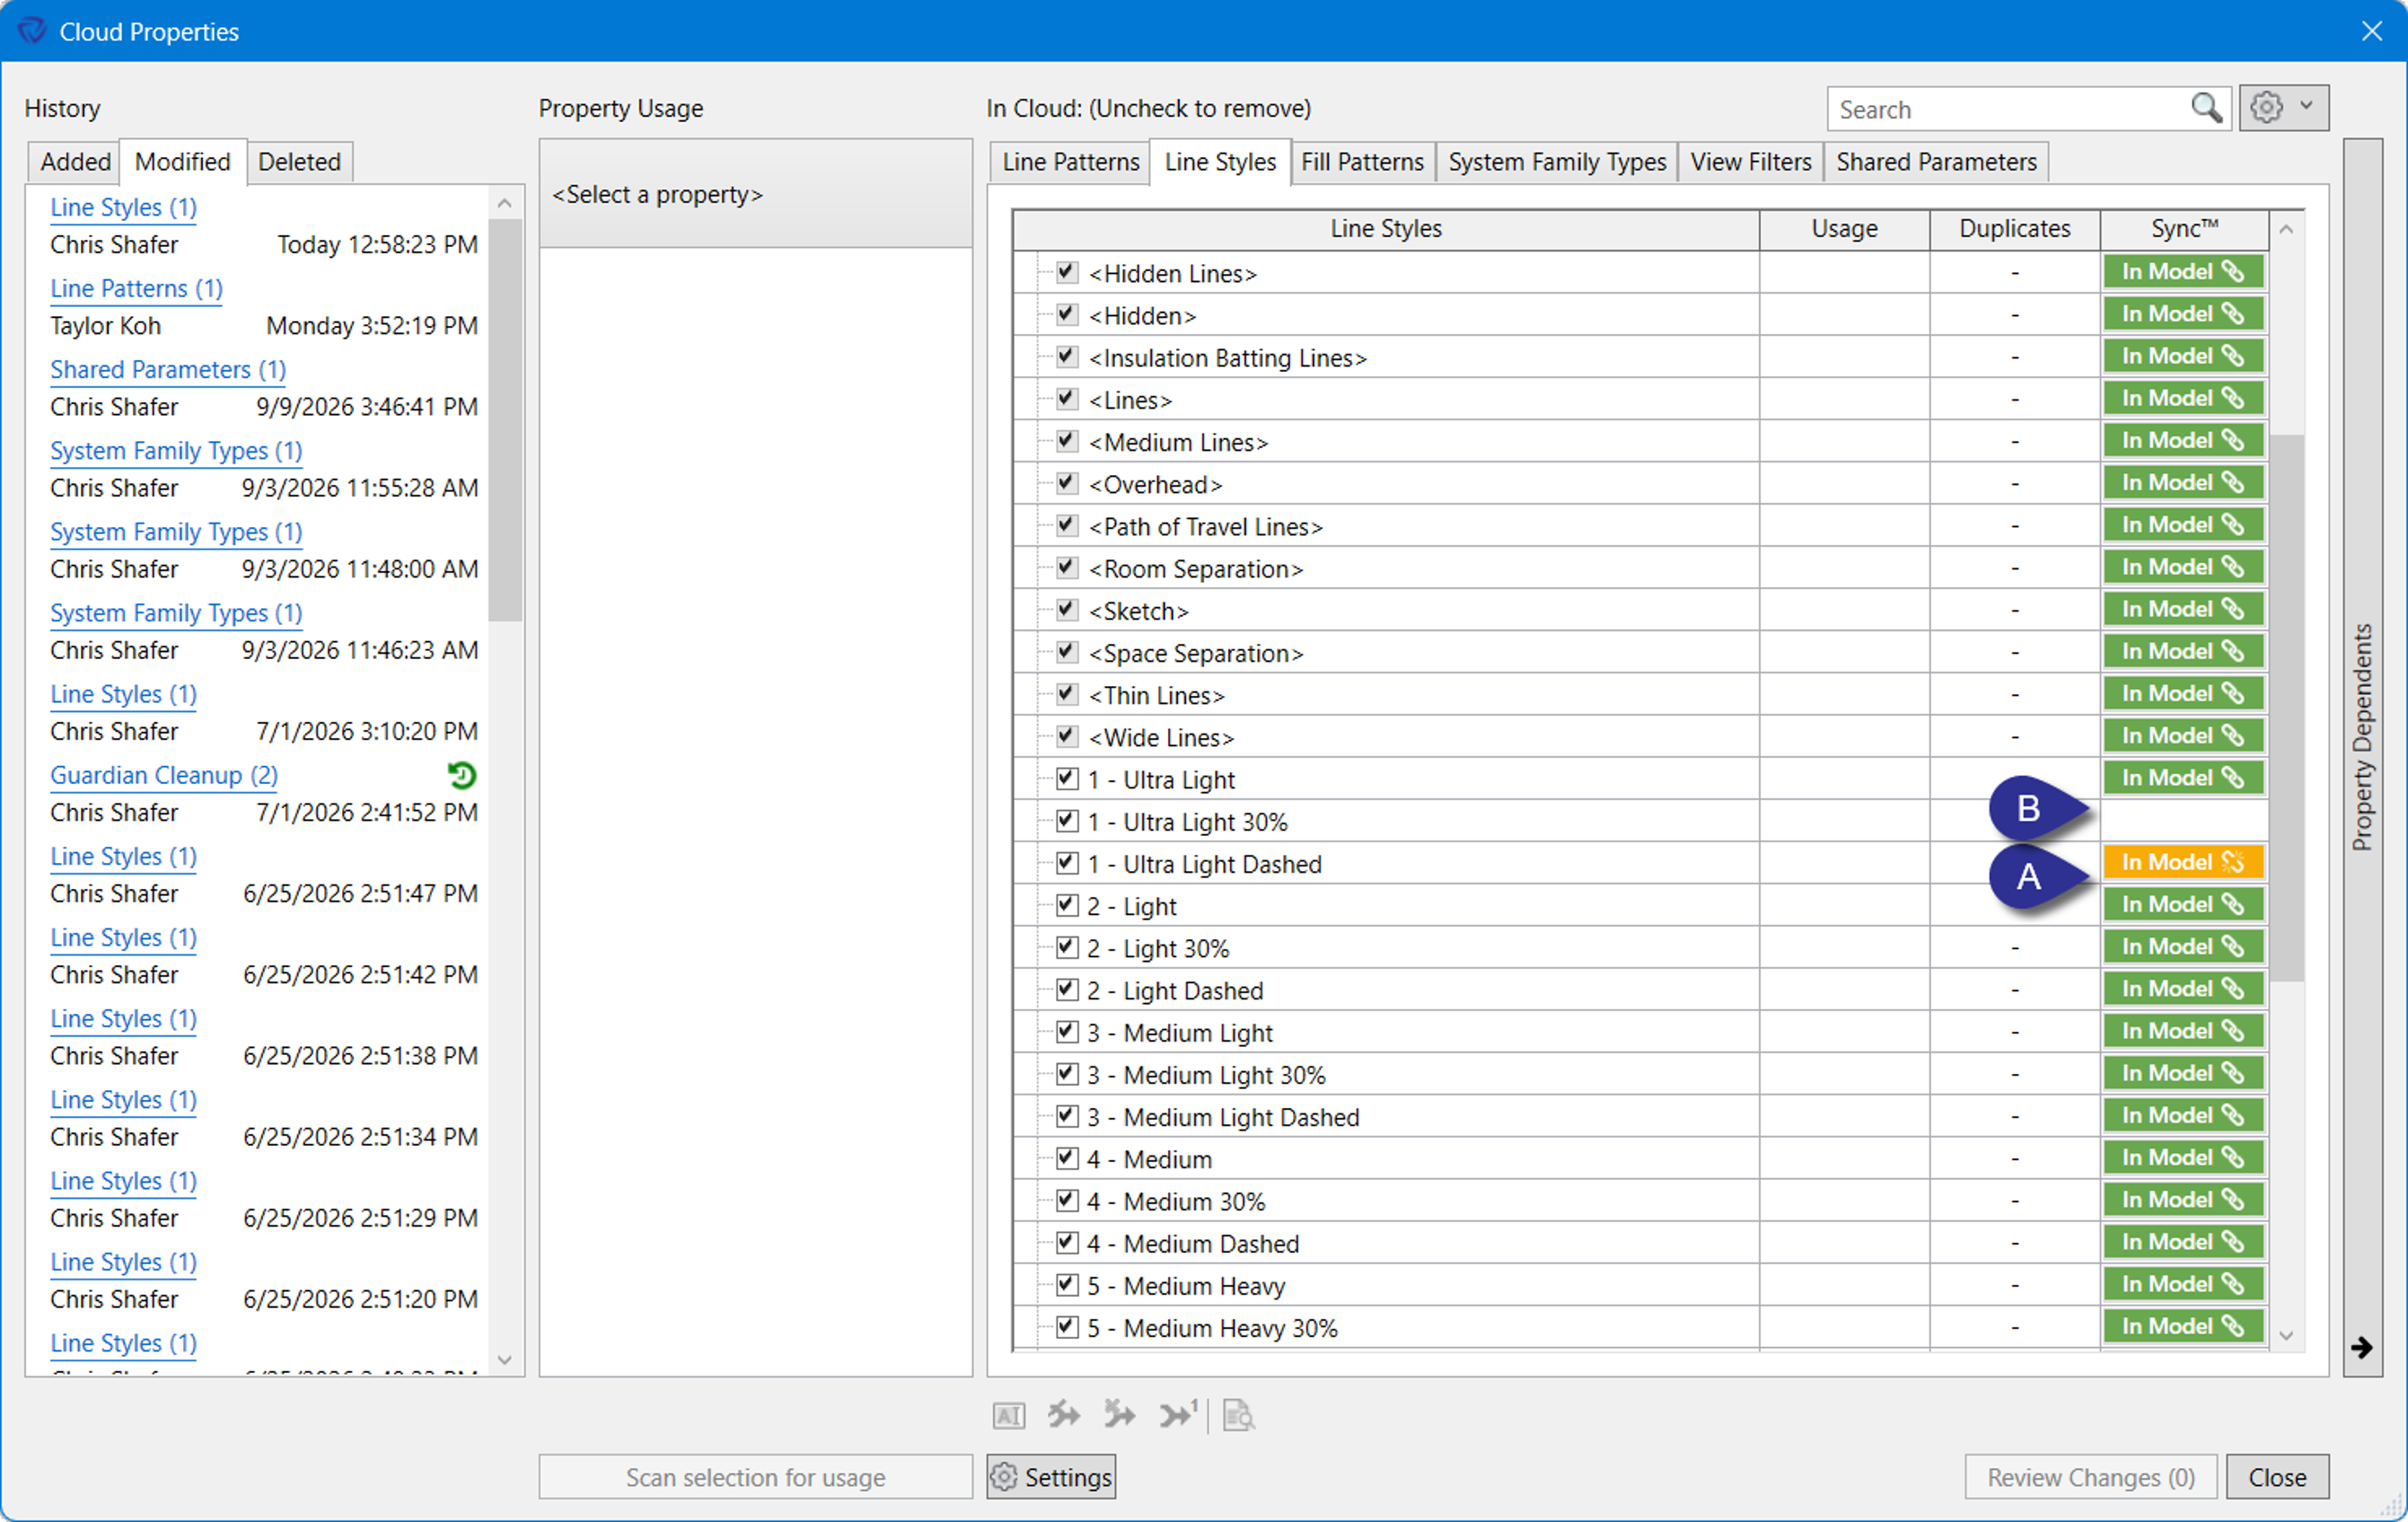
1. Provides a high-level overview comparing what is in the cloud against what is in the active model. It identifies:
2. Provides intra-cloud mappings to further refine standards.
Note: The Cloud Properties dialog does not show properties in the active model that are not in the cloud. That information is available under Model Properties.
Each property type has its own tab. Properties with no In Model button are not present in the active model and must be downloaded before a sync relationship can be established.
When a property hosted in the cloud is not present in the active model, the cloud property must be downloaded from the specific property type dialog.
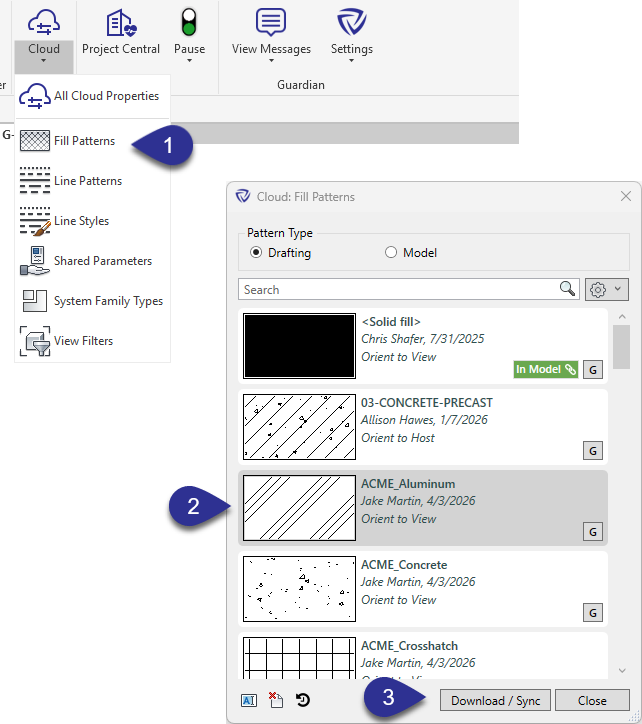
To download a specific property type:
After downloading, use the Model Properties dialog to map any old standard properties to the newly downloaded ones and purge duplicates. Refer to the Model Properties article for a full walkthrough.
The cloud property dialogs mirror their model-level counterparts, with two additional filters:
As with Model Properties, intra-cloud mapping can be performed to further refine a firm’s standard Revit properties. Refer to the Mapping Functions with the Model Properties knowledge base article to learn more about creating mappings within All Cloud Properties.
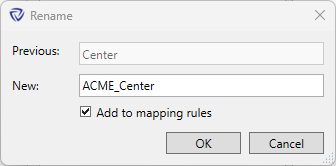
When you rename or delete a cloud property, Guardian prompts you to create a mapping rule for that action – the same behavior you may already be familiar with from Model Properties.
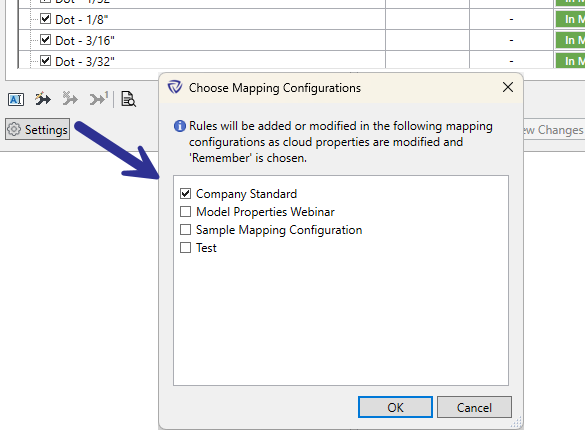
Be sure to choose your Mapping Configuration first by going to Model Properties > Settings.
Note: Mapping rules created from cloud property changes are separate from Guardian’s automatic sync behavior. Mapping rules handle the renaming and removal of properties in models; sync relationships handle keeping the property content aligned with the cloud standard. Both can be in effect at the same time.
When a cloud property and a model property match by name but no sync relationship has been formally established, the property will show a green In Model button with no link icon. Clicking the green In Model button establishes the sync relationship between the two.
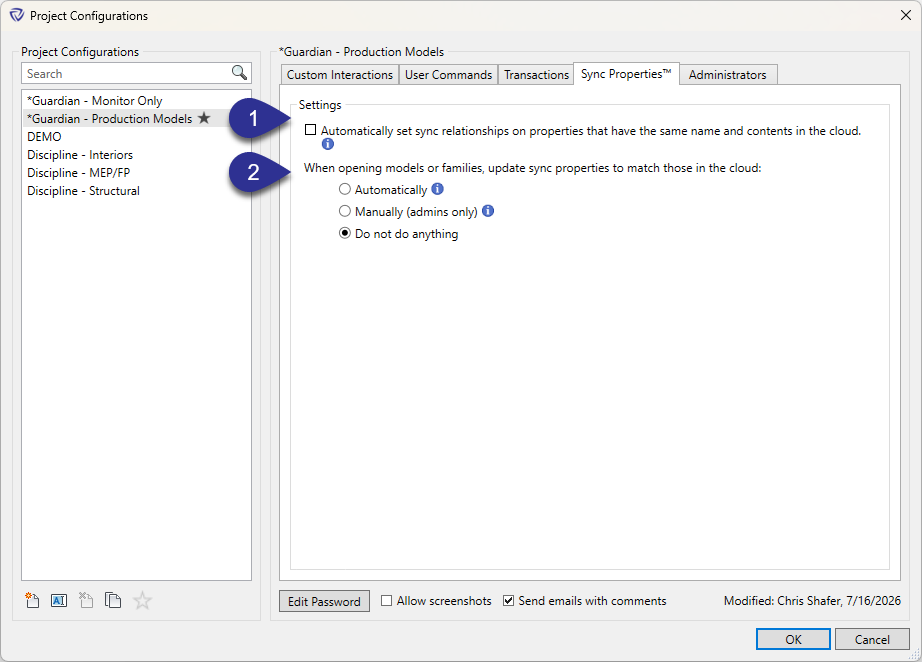
Automatic sync behavior is controlled in Project Configurations under the Sync Properties tab. Tool tips within the dialog provide additional context for each setting.
When enabled, Guardian scans for properties in the open model that match a cloud property by both name and content. When a match is found, a sync relationship is established automatically — no manual action required.
When checked, a quick progress bar will appear when opening models or loading content.
This setting is recommended for firms that are building out their cloud property library, as it reduces the manual work of linking existing model properties to newly uploaded cloud standards. It is not recommended to remain on indefinitely as it will slow the performance of Guardian and the model.
This setting controls what Guardian does when it detects a property that is out of sync with the cloud standard. There are three options:
Recommendation: Most firms set this option to Do not do anything to maintain efficient model opening times. Administrators are trained to review out-of-sync properties on a regular basis using the Model Properties dialog.
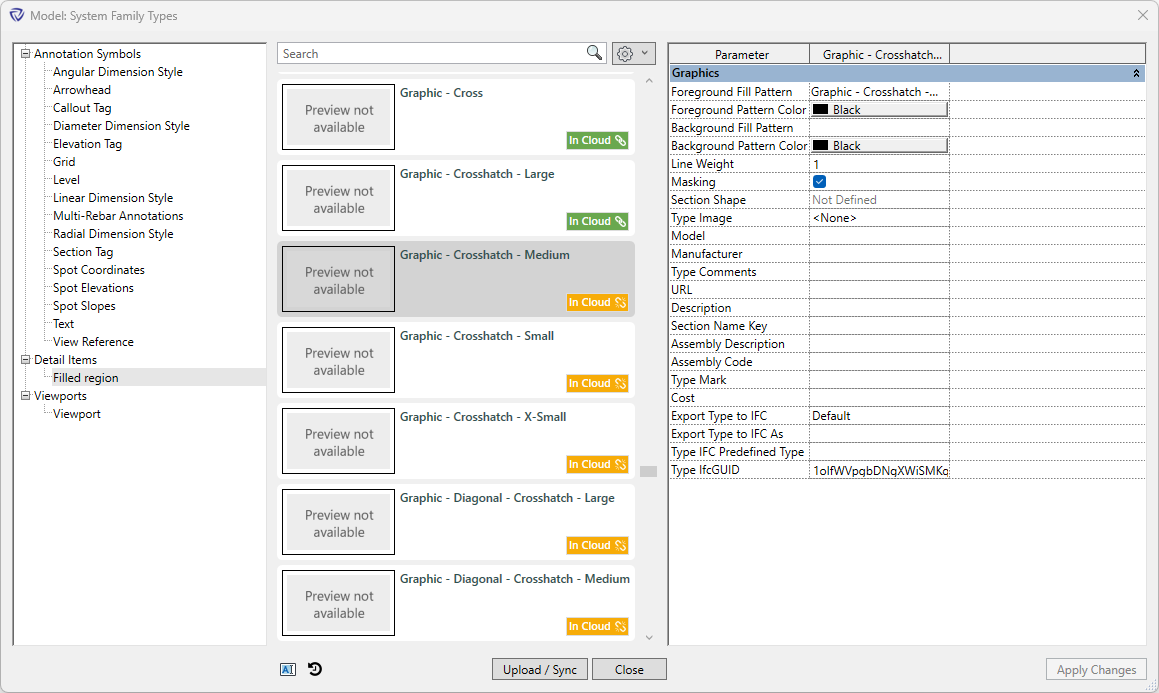
A property becomes out of sync when:
Out-of-sync properties are indicated by a yellow In Cloud icon in both the Model Properties dialog and the Cloud Properties dialog for end-users.
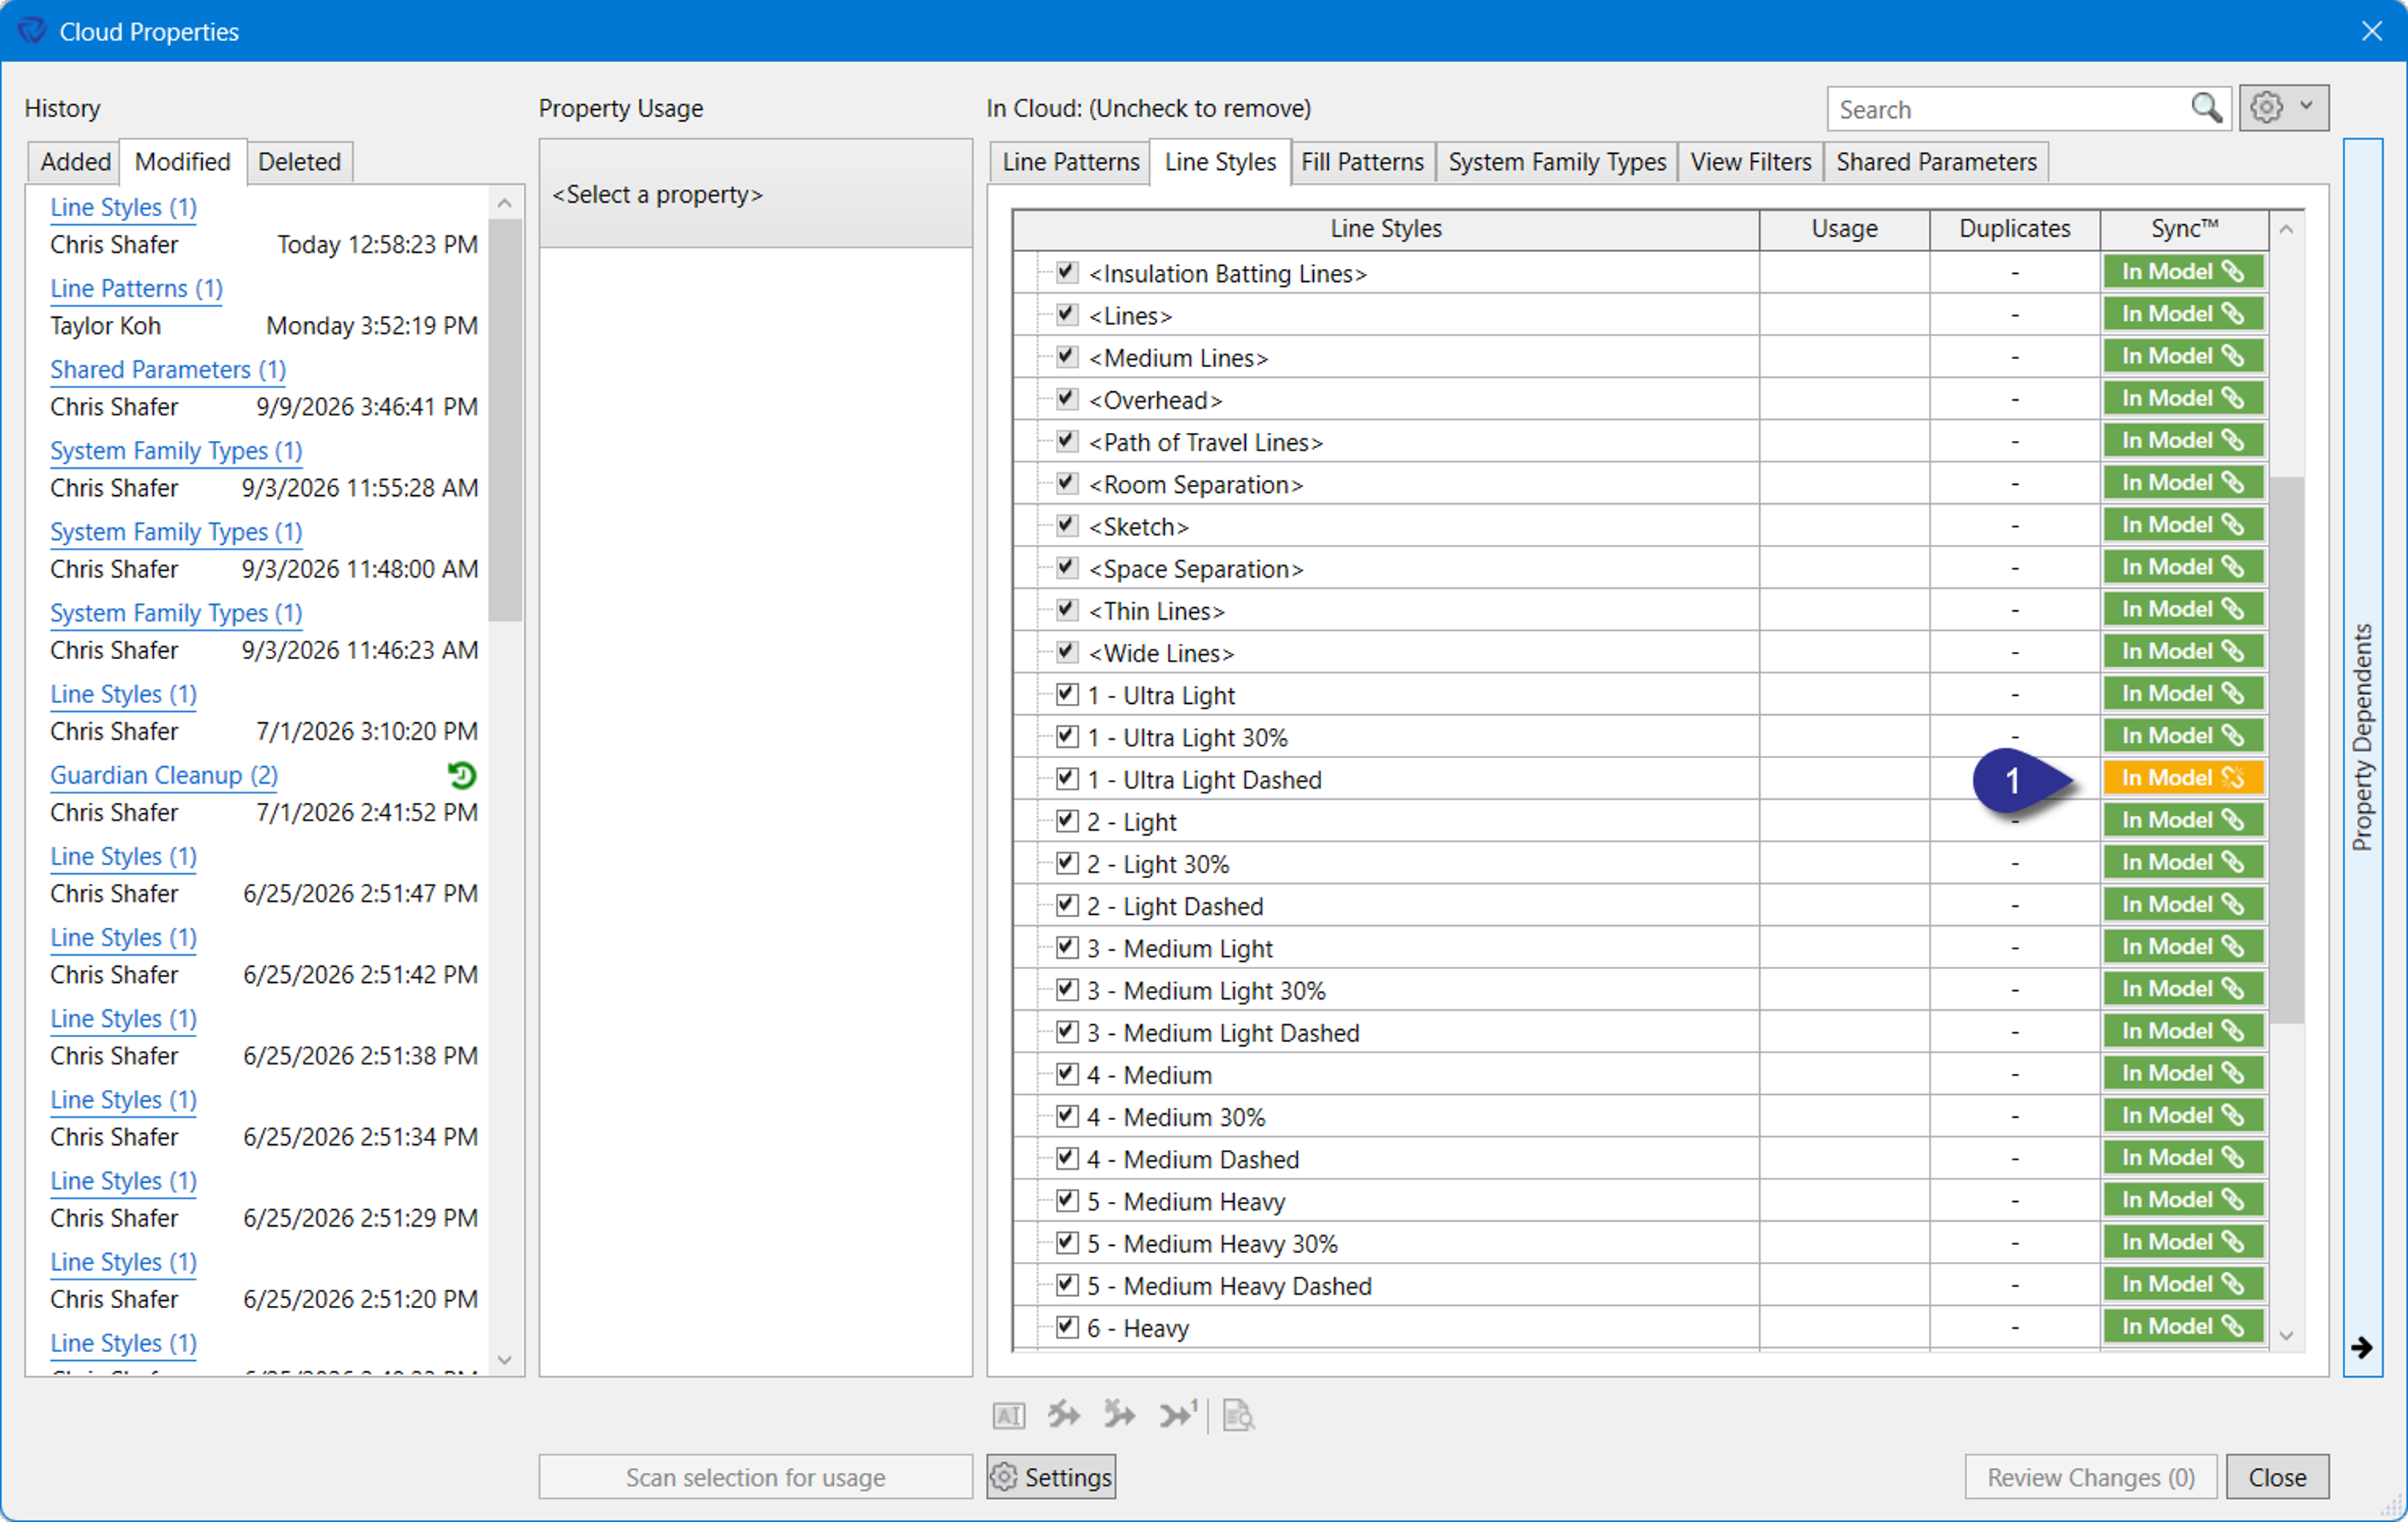

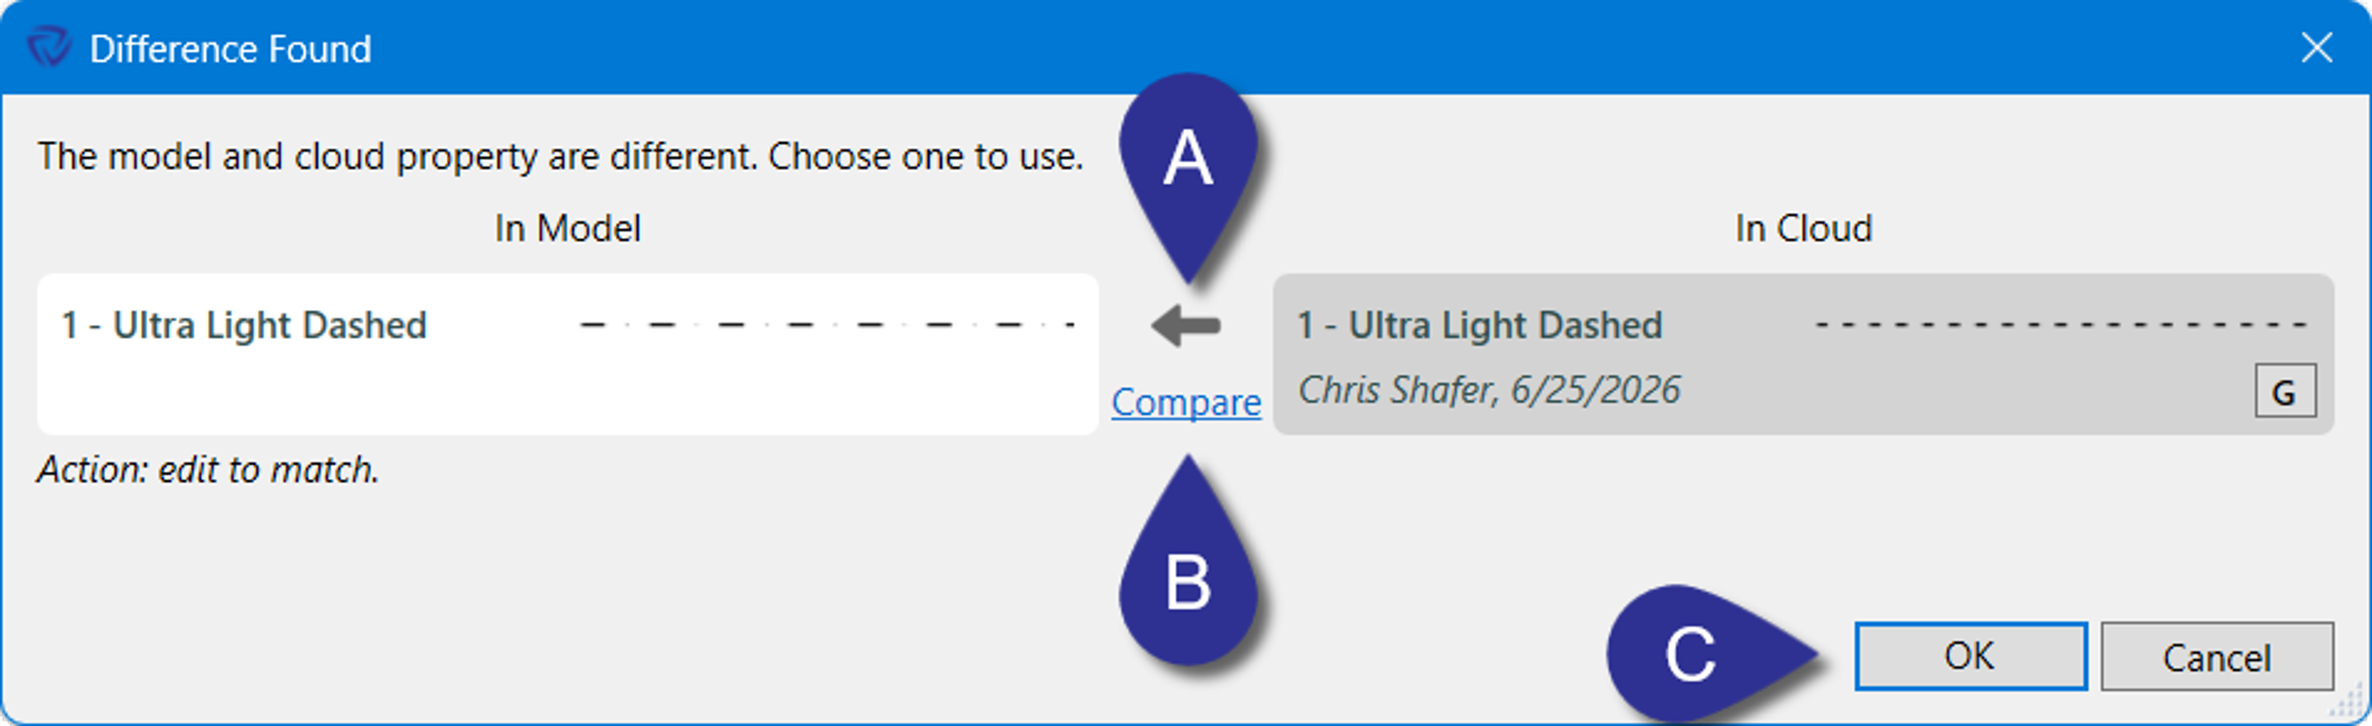
Selecting Fix sync relationship opens the Difference Found dialog.
This dialog shows:
To resolve the difference:
1. Use the toggle arrow in the center to choose the direction of the update:
2. Click Compare to open a side-by-side view with all differences highlighted before committing to a direction
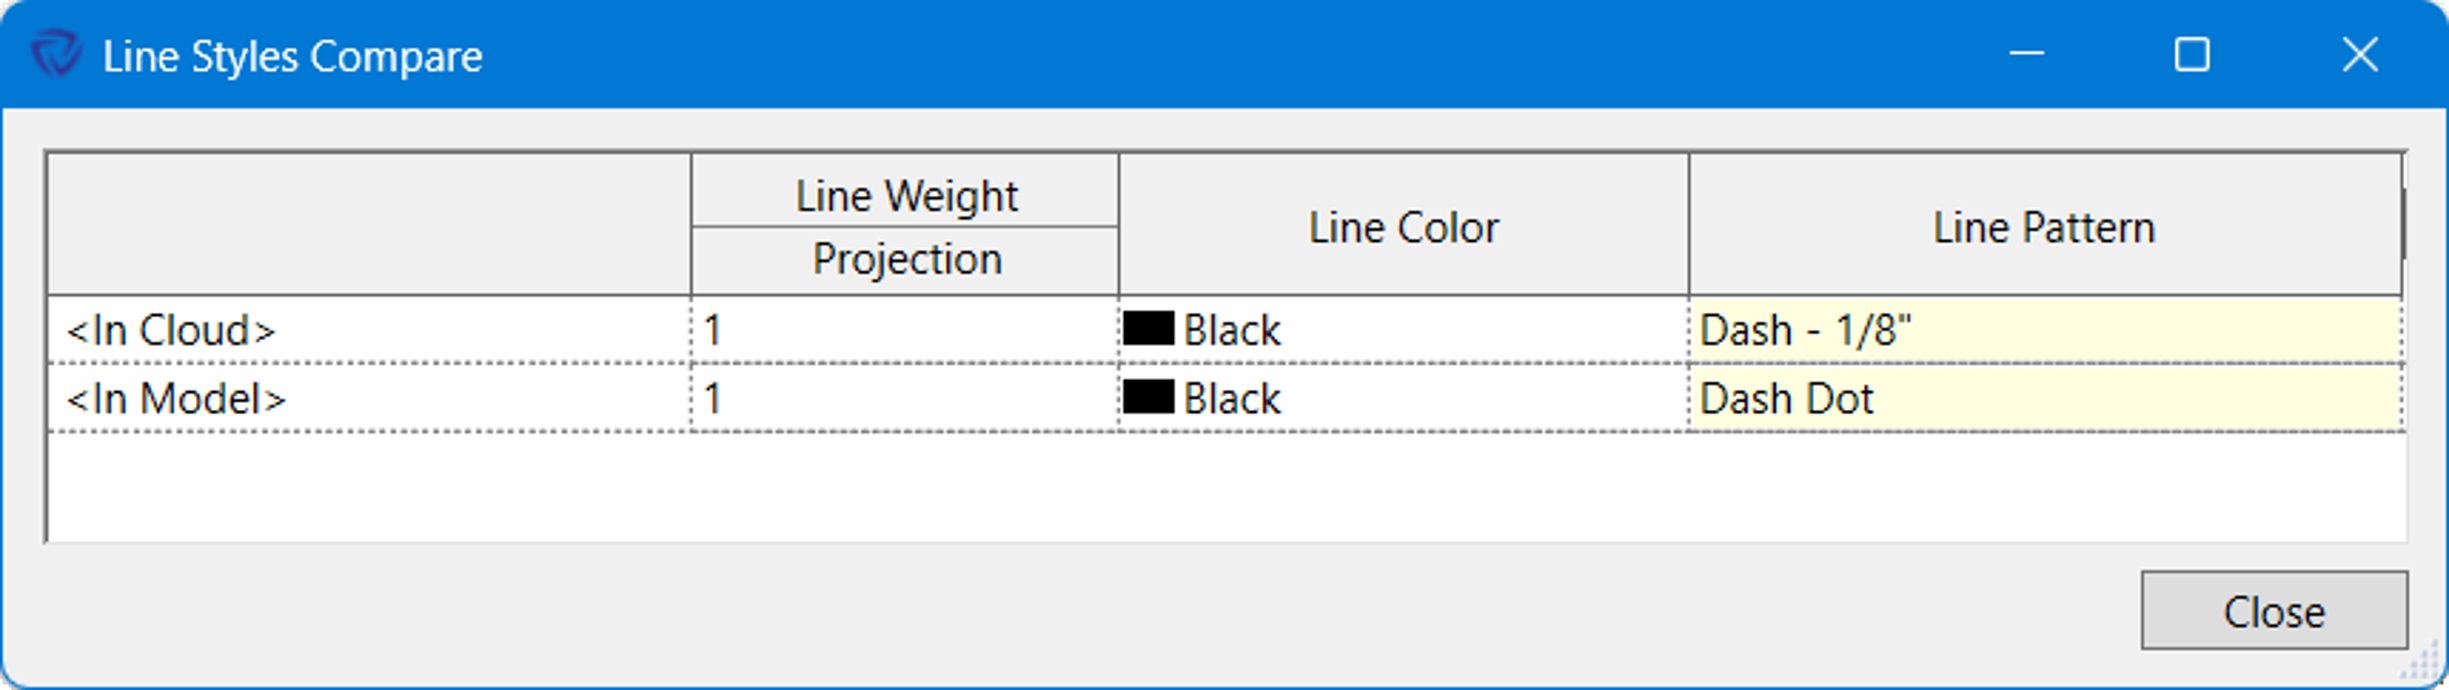
3. Once the direction is confirmed, click OK to apply the change to complete the sync resolution.
Contact our support team for more information.
Guardian Sync Properties™ allows administrators to centrally manage company standard Revit properties in the cloud and keep them synchronized across all registered models. Rather than maintaining properties inside template or container files, properties are stored in the cloud and made available to any project – regardless of Revit version.
Key capabilities:
Note: Uploading properties requires an open registered model that contains the properties you want to store in the cloud. Company Administrator access is required to upload, manage, and configure sync settings. End users can download cloud properties into their active model, but cannot upload.
Guardian Sync Properties operates through two complementary interfaces, both accessible from the Revit ribbon. Understanding the difference between them is the foundation for working with Guardian Sync Properties effectively.
Think of these as mirror images of each other. Model Properties is the upload interface and shows all properties in the active model; Cloud Properties is the download interface and shows all properties hosted in the cloud.
Pro Tip: When uploading a firm’s standard Revit properties to the cloud, start with a cleaned Revit Project Template (using Model Properties to clean the template first) or a content container.
Sync status icons appear throughout the upload dialog and property panels. Because you will encounter them during the upload process and when managing cloud properties, it helps to understand what each one means before getting started.
| Icon | Meaning |
|---|---|
|
Property is synchronized with the corresponding cloud property |
|
Property is out of sync with the corresponding cloud property |
|
Property name and contents match the corresponding cloud property |
|
Property name matches but settings differ from the corresponding cloud property |
|
Property is available to be uploaded to the cloud |
Note: For admins, these icons are clickable actions that allow you to modify or fix the relationship indicated. End-users see these icons as indicators only.
It is not possible to have multiple properties in the cloud with the same name. When a name conflict exists, it must be resolved individually — it cannot be handled by bulk upload actions.
The initial upload should be performed from your firm’s Revit template or master container file that contains all of your company standard properties. Before uploading, it is strongly recommended to use Guardian’s Model Properties dialog to clean the template or container file down to only firm-approved standards. Uploading before cleaning risks pushing non-standard properties into the cloud.
Pro Tip: Cloud properties are Revit-version independent. There is no need to upload the same property from multiple Revit versions.
Because many Revit properties are nested within others, the order in which you upload matters. Uploading in the wrong order may result in nested properties not being recognized as already in the cloud when their parent property is uploaded.
Upload Revit properties in the following order:
1. Open a registered model that contains the company standard properties you want to upload
2. Expand the Model dropdown and select the desired property type (A) (e.g., Fill Patterns, Line Patterns, Line Styles)
3. Select one or more properties to upload (B). Use Shift to select a range or Ctrl to select individually
4. Click Upload/Sync (C)
5. Within the Upload/Sync dialog, you have two options:
6. When uploading a property for the first time, you will be prompted with three options
7. Once a property is uploaded, an In Cloud icon appears next to it in the property dialog. The property is now stored in the cloud and can be downloaded into any registered model by both admins and end-users
There are multiple ways to view all properties in the cloud. The All Cloud Properties provides a comprehensive tabular view of all the properties. While the individual properties types can be viewed on a detail level and compared with other properties of the same type.
To view and manage all properties stored in the cloud, click the Cloud icon in the Guardian ribbon, or All Cloud Properties from the Cloud dropdown.
The All Cloud Properties dialog provides multiple functions for maintaining cloud properties:
1. Provides a high-level overview comparing what is in the cloud against what is in the active model. It identifies:
2. Provides intra-cloud mappings to further refine standards.
Note: The Cloud Properties dialog does not show properties in the active model that are not in the cloud. That information is available under Model Properties.
Each property type has its own tab. Properties with no In Model button are not present in the active model and must be downloaded before a sync relationship can be established.
When a property hosted in the cloud is not present in the active model, the cloud property must be downloaded from the specific property type dialog.
To download a specific property type:
After downloading, use the Model Properties dialog to map any old standard properties to the newly downloaded ones and purge duplicates. Refer to the Model Properties article for a full walkthrough.
The cloud property dialogs mirror their model-level counterparts, with two additional filters:
As with Model Properties, intra-cloud mapping can be performed to further refine a firm’s standard Revit properties. Refer to the Mapping Functions with the Model Properties knowledge base article to learn more about creating mappings within All Cloud Properties.
When you rename or delete a cloud property, Guardian prompts you to create a mapping rule for that action – the same behavior you may already be familiar with from Model Properties.
Be sure to choose your Mapping Configuration first by going to Model Properties > Settings.
Note: Mapping rules created from cloud property changes are separate from Guardian’s automatic sync behavior. Mapping rules handle the renaming and removal of properties in models; sync relationships handle keeping the property content aligned with the cloud standard. Both can be in effect at the same time.
When a cloud property and a model property match by name but no sync relationship has been formally established, the property will show a green In Model button with no link icon. Clicking the green In Model button establishes the sync relationship between the two.
Automatic sync behavior is controlled in Project Configurations under the Sync Properties tab. Tool tips within the dialog provide additional context for each setting.
When enabled, Guardian scans for properties in the open model that match a cloud property by both name and content. When a match is found, a sync relationship is established automatically — no manual action required.
When checked, a quick progress bar will appear when opening models or loading content.
This setting is recommended for firms that are building out their cloud property library, as it reduces the manual work of linking existing model properties to newly uploaded cloud standards. It is not recommended to remain on indefinitely as it will slow the performance of Guardian and the model.
This setting controls what Guardian does when it detects a property that is out of sync with the cloud standard. There are three options:
Recommendation: Most firms set this option to Do not do anything to maintain efficient model opening times. Administrators are trained to review out-of-sync properties on a regular basis using the Model Properties dialog.
A property becomes out of sync when:
Out-of-sync properties are indicated by a yellow In Cloud icon in both the Model Properties dialog and the Cloud Properties dialog for end-users.
Selecting Fix sync relationship opens the Difference Found dialog.
This dialog shows:
To resolve the difference:
1. Use the toggle arrow in the center to choose the direction of the update:
2. Click Compare to open a side-by-side view with all differences highlighted before committing to a direction
3. Once the direction is confirmed, click OK to apply the change to complete the sync resolution.
Contact our support team to receive personalized assistance.
