Registered Projects

Knowledge BaseGetting Started
Registered Projects

In This Article


Overview

The Registered Projects dialog provides many features that enable Company/Project Administrators to view all registered project models, review high-level model data, and edit the Project Configurations and Mapping Configurations for single or multiple project models simultaneously.  

Across firms of all sizes, we consistently observed the same challenges:

  • What models are being created and where are they being hosted or saved
  • Limited visibility into who is working in which models
  • Difficulty identifying early warning signs of model performance
  • Establish a data architecture strategy across portfolio of projects

To address these issues, Registered Projects and Label Manager were redesigned with a new interface in Guardian 3.3. Together, they give BIM leaders a more scalable way to monitor Revit activity, organize project data, and standardize oversight across the firm. Learn more about Label Manager here.

Registered Projects Dialog

The Registered Projects dialog lets Guardian admins view and manage registered Revit models in one place.

Use it to:

  • Review all known Revit models your organization interacts with, including local, network, and ACC models
  • See which models are currently open
  • Monitor file size trends over time
  • Filter projects by metadata such as location, Revit version, labels, and project groups
  • Save filtered views as tabs
  • Take actions such as labeling, archiving, or unregistering models

Who Can Access Registered Projects

The Registered Projects dialog is available to:

  • Project Administrators
  • Company Administrators

If you do not see Registered Projects, confirm that your Guardian role includes Project or Company Admin permissions.

Open Registered Projects

Click Registered Projects under Settings

To open Registered Projects in Revit:

  1. Go to Add-Ins
  2. Select Guardian Settings
  3. Click Registered Projects

Structure and Features

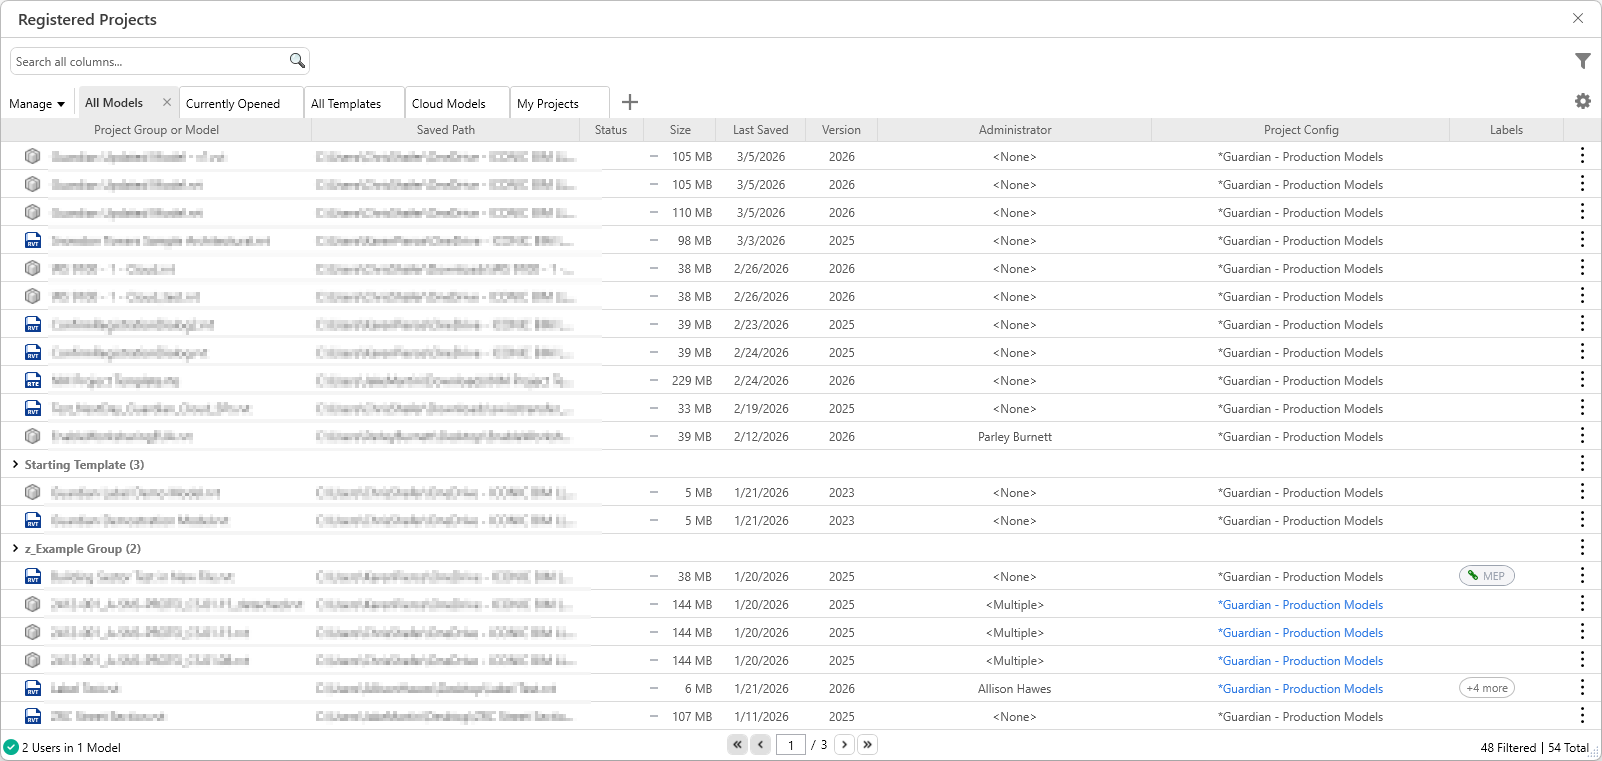
The Registered Projects dialog is structured to provide avenues for reviewing and managing the information about all registered models. When first opening the dialog, you’ll see many features that help organize the model data. Details of each feature are further described below:

  1. Tabs provide a customized view of all registered models, and custom tabs can be created
  2. Under the cog icon, columns can be turned on and off on a tab-by-tab basis
  3. Selecting the filter allows you to drill down to specific data for that tab
  4. By default, Project Groups are automatically created for ACC projects by ACC Name (ACC Model Name GUID), and groups can be manually created under the Manage menu
  5. Labels can be automatically or manually assigned to project models to establish the foundation for your model data architecture

Managing Tabs

The Registered Projects dialog includes built-in tabs that make it easier to focus on specific groups of models.

The following tabs are included out of the box:

  • All Models: Shows all Revit models
  • Currently Open: Shows all Revit models that are currently opened within the firm
  • Cloud Models: Shows cloud models identified using ACC Project ID and Hub
  • My Projects: Shows models where you are assigned as a Guardian administrator

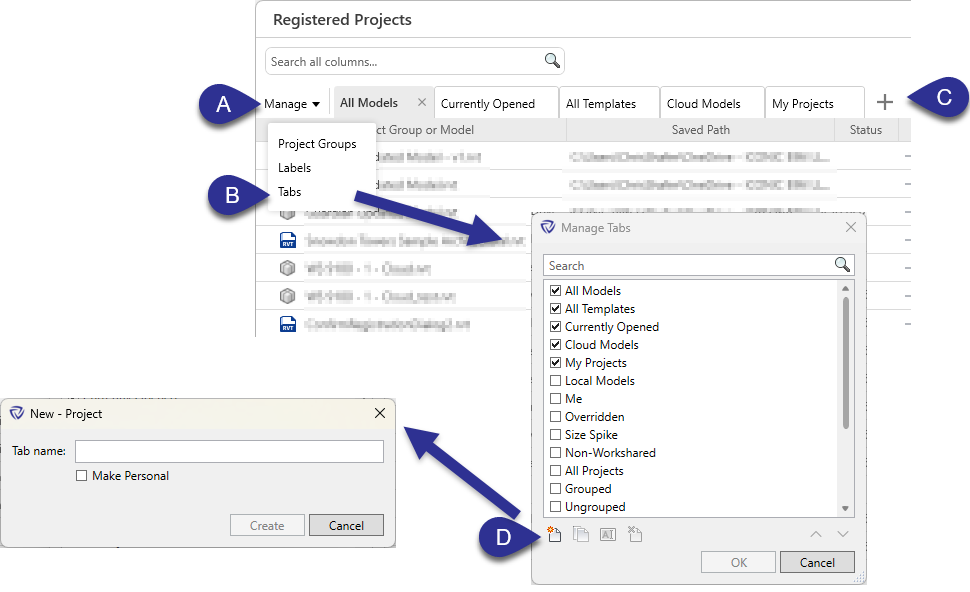
These tabs can be enabled, disabled, or customized through Manage Tabs, or by selecting the plus icon + to the right of the My Projects tab.

From within the Manage Tabs dialog, you can:

  • Turn built-in tabs on or off
  • Create new tabs
  • Duplicate tabs
  • Rename tabs
  • Reorder tabs
  • Delete tabs

This allows teams to standardize common views for project review and management. Company administrators can create tabs that are available and seen by all Project Administrators. Any edits to a tab are limited to the users creating the edits.

Create a Custom Tab

Steps to create a custom tab in Registered Projects
  1. To open Manage Tabs from Registered Projects, click Manage (A) in the top left, then click Tabs (B)
    • You can also open this dialog by clicking the plus sign (+) on the right of the tabs (C)
  2. Click the New icon (D)
  3. Enter a tab name, then click Create. This adds the tab to the list in the Manage Tabs dialog
    • The Make Personal checkbox is limited to company administrators to create their own tabs
    • Any tabs with Make Personal not selected will be made available to all project administrators
    • Any tabs created by project administrators will be limited to only that administrator
  4. Click OK
  5. Use the Cog icon to select which columns are to be displayed
  6. Click the Filter icon in the top-right corner of Registered Projects and apply the filters you want to use
  7. Click Save to save the filtered view to your new tab

Use the Currently Open Tab

Currently open tab with mouse hover on green status icon

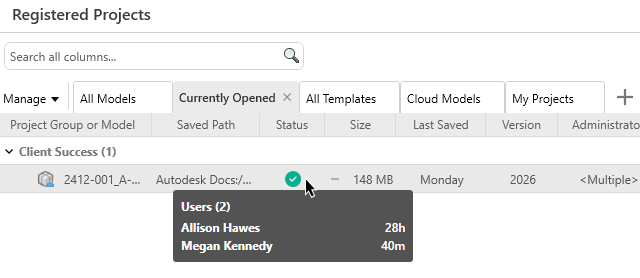
The Currently Open tab shows which models are actively open and who is currently working in them.

To see who is active in a model, hover over the green check mark in the status column.

This shows which users are currently in the model and how long each user has had the model open.

Note: The status column is available on all tabs.

total active number of users in models

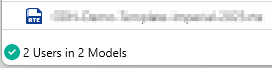
The lower left-hand corner of Registered Projects displays the total active number of users and models.

Customize Your Columns

Customize your Registered Projects view

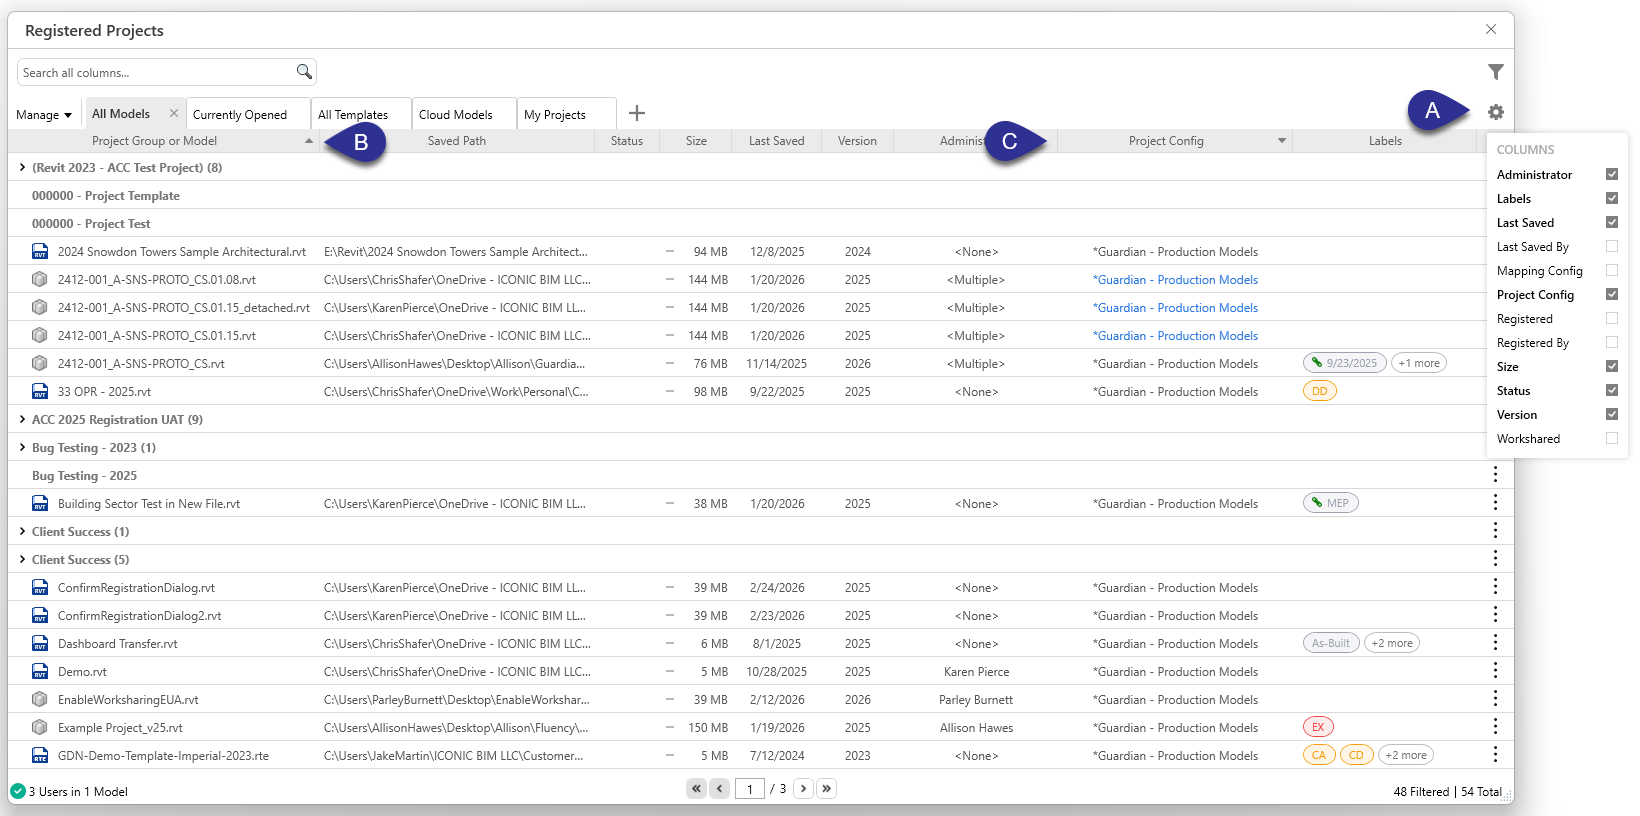
You can adjust which columns are visible in Registered Projects to match your workflow. This can help reduce clutter and make it easier to focus on the project data your team uses most often.

To customize the columns:

  1. Select the Cog icon (A) on the right side of the dialog
  2. Check and uncheck columns to customize your view

You can also:

  • Sort columns A to Z or Z to A by clicking on the column header (B)
  • Resize columns by dragging the edge of the column header (C)
  • Reorder columns by clicking and dragging a column header to a new position

Kebab Menu

Kebab menu expanded

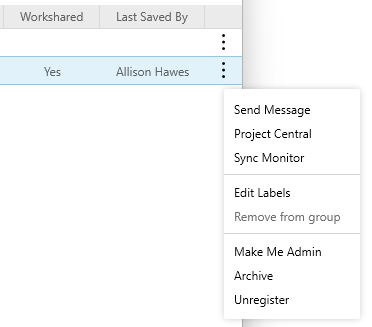
The kebab menu (three-dot menu) located on the far right next is available at both the model and group levels. You can also open this menu by right-clicking the row.

Use this menu to perform actions directly from Registered Projects.

Model-Level Actions

Available actions at the model level may include:

  • Send Message: Send a Guardian Message to the users within the selected project or to the entire company (for Company Administrators only)
  • Project Central: Open Project Central for that model
  • Sync Monitor: Open Sync Monitor for that model
  • Edit Labels: View applied Labels, add existing labels, or create a new label
  • Add to Group: Add the model to a project group
  • Make Me Admin: Assign yourself as a Guardian admin for the model
  • Archive
  • Unregister

Group-Level Actions

Available actions at the group level (the kebab menu associated with the group level header) may include:

  • Expand All: Expand all groups in the tab
  • Collapse All: Collapse all groups in the tab
  • Rename Group
  • Delete Group
  • Send Message: Send a Guardian Message to the project group or company
  • Unregister

This makes it possible to manage projects without opening each model and leaving the Registered Projects dialog.

File Size Indicators

File size indicator key

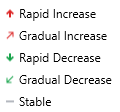
Registered Projects includes a file size indicator that shows how a model’s file size is trending over time.

The indicator helps you quickly identify whether a file is experiencing:

  • Rapid Increase: A noticeable spike in size
  • Gradual Increase: Steady growth over time
  • Rapid Decrease: A noticeable reduction in size
  • Gradual Decrease: Steady reduction over time
  • Stable: Little or no change over time, or not enough data has been collected yet

View the Exact File Size Change

Mouse hover over file size increase icon

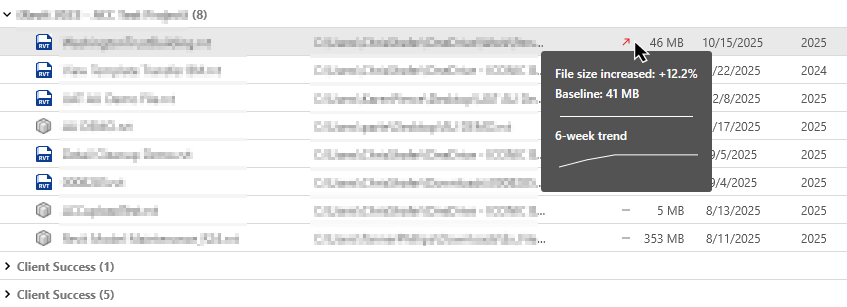
Hover over the file size indicator to see the exact percentage change in file size.

Guardian calculates this trend using a 6-week history, so you can compare current file size behavior against recent model activity.

Note: File size trends will appear once at least 3 weeks of data have been collected.

This can help identify models that may need review before file growth becomes a larger issue.

Search and Filter Projects

Registered Projects search and filter functions

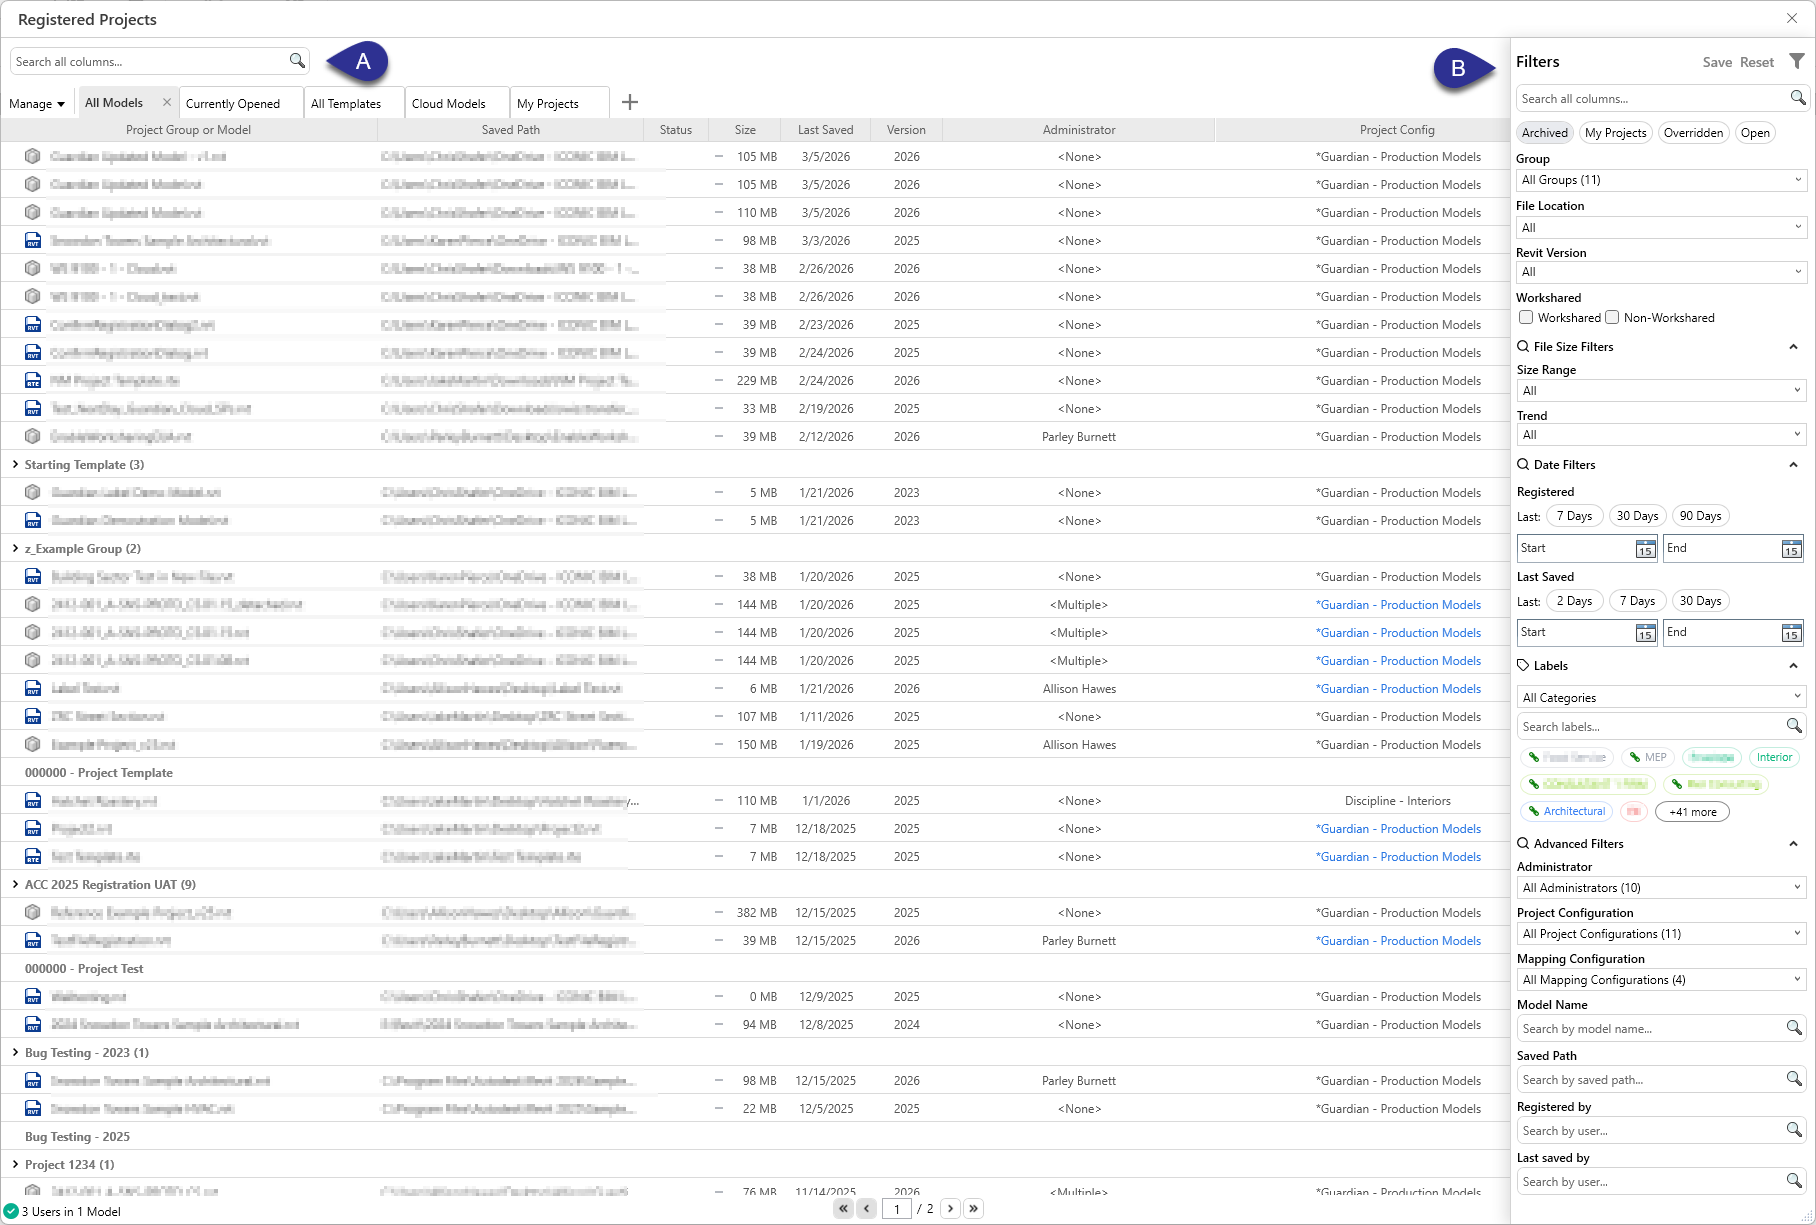
The Registered Projects dialog includes both a search bar (A) and a Filter Panel (B). Both can be used to quickly narrow down results.

Search Behavior

Search supports:

  • Standard keyword search
  • Search within the Filter Panel
  • Multi-term search
  • Search across multiple fields

Search can scan across available model metadata, including hidden fields, making it easier to locate projects, users, workflows, regions, disciplines, and other project data.

The Filter Panel provides a large assortment of filtering options to narrow the project list based on the metadata most relevant to your workflow.

Project Grouping

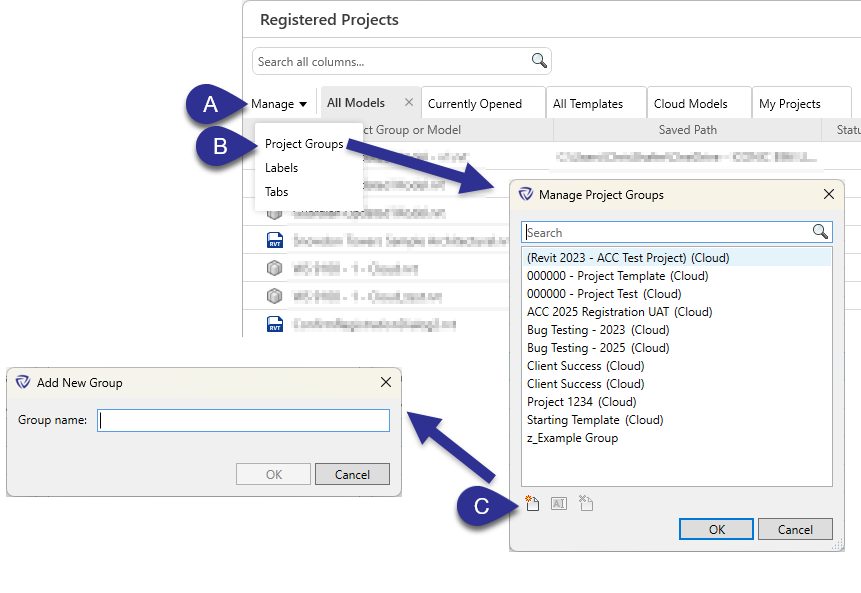
Registered Projects supports project grouping to help you organize related models together in a single view.

For ACC cloud models, Guardian automatically groups related models based on their ACC project (ACC Project GUID). This removes the need to manually create groups for models that already belong together in ACC.

You can also manually create your own custom project groups in Guardian. Please note that auto-grouping of ACC-hosted models takes precedence over manually created groups.

Manage Project Groups

Manage project groups in Registered Projects
  1. In Registered Projects, click the Manage dropdown (A), then select Project Groups (B)
  2. In the Manage Project Groups dialog, you can select a group, rename groups, or delete groups
    • Note: You cannot rename or delete project groups marked (Cloud). These groups are pulled in directly from ACC.
  3. To create a new group, click the New icon (C)
  4. Enter your group name, then click OK

Apply Labels from Registered Projects

Apply labels through Registered Projects

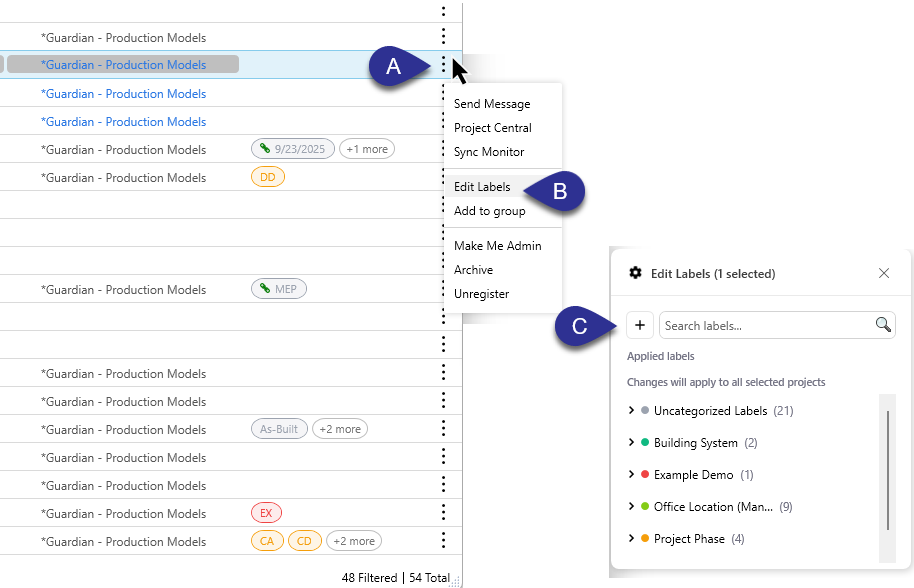
Both Project and Company Administrators can apply Labels to models directly from Registered Projects.

Add a Label

  1. Open the kebab menu for a model, or right-click the row (A)
  2. Select Edit Labels (B)
  3. Choose an existing label or create a new label by clicking the plus sign (+) (C)

Labels can be automatically assigned to models and can only be created by company administrators. Please refer to the Label Manager article to learn more.

Need more help?

Contact our support team or visit our support center for access more resources.
Guardian graphic