


Contact our support team for more information.
Workset Configurations address two distinct limitations of Revit worksets: consistent creation and naming of worksets and the assignment of placed elements onto the correct worksets. It is a powerful feature that provides Company Administrators the ability to establish company standard worksets and automate adherence to those standards. Multiple Workset Configurations can be created for different disciplines, typologies, or clients, and each Workset Configuration can contain a unique list of worksets. With custom rule-based automation, Workset Configurations can place elements on the correct pre-defined worksets.
Workset Configurations can be found under Settings in the ribbon. A minimum of one configuration must be created.

New Workset Configurations can be created or modified using the New, Edit, Delete, or Duplicate buttons at the bottom of the window. Each configuration can contain multiple worksets, dependent on the firm’s various project types and/or disciplines.
The Assign to project button can be used to assign a Workset Configuration to a currently open project either before or after worksharing is enabled. A Workset Configuration must be assigned to a project in order to be applied to that project.
Pro Tip: Worksets can be copied/pasted between sets using the CTRL+C and CTRL+V commands.
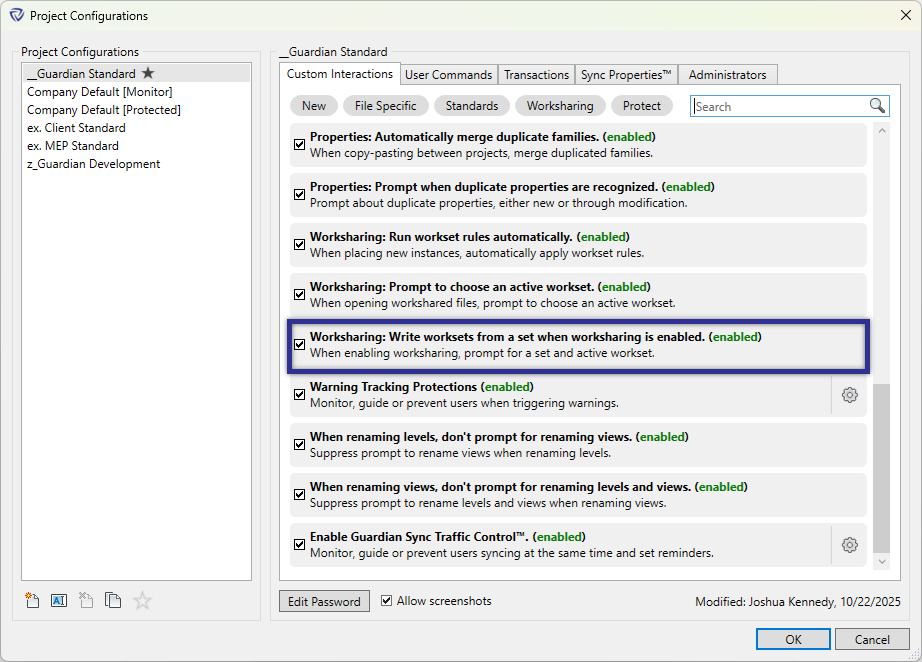
When activated under Project Configurations > Custom Interactions > Worksharing: Write worksets from a set when worksharing is enabled, end-users will be automatically prompted to load the appropriate Workset Configuration into the active project when worksharing is enabled.

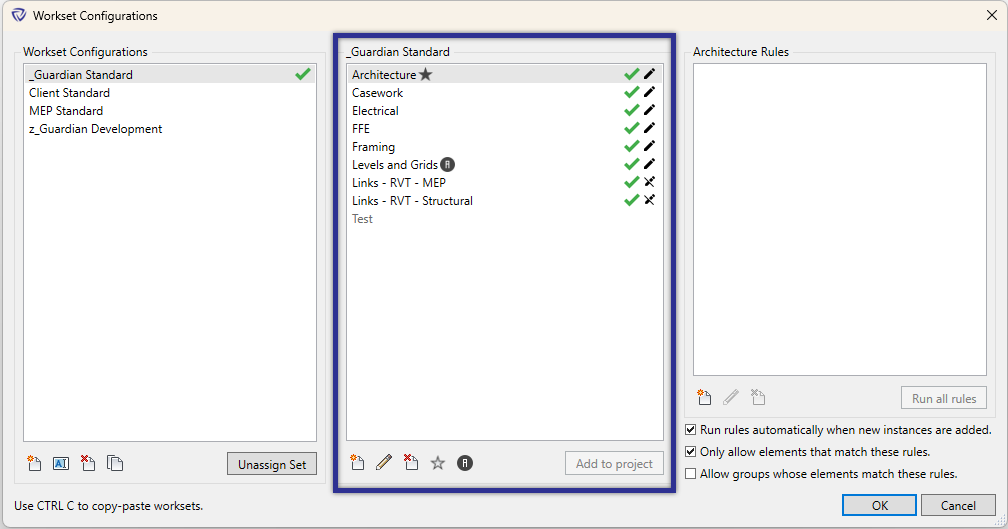
Worksets must be added to each configuration. The worksets added here can be renamed or deleted using the buttons at the bottom of the window.
There are two important icons to be applied to worksets:

Star Icon: Establishes the default workset. The default workset will replace the Workset1 when worksharing is enabled or if added to a project where Workset1 already exists. It will also be the defaulted option when selecting the active workset upon opening the model (if turned on in Company Settings).

Grid Icon: The workset designated to replace the Shared Levels and Grids workset when worksharing is enabled or when added to a workshare enabled project. When added to a workshared enabled project, a prompt will ask if the workset is to replace the existing Levels and Grids workset or to be added as a separate workset.
The workset portion of Workset Configurations provides additional information that assists in managing the active project model and the configurations as a whole. There are additional icons and information applied to worksets:

Workset Configurations allow for the creation of rules-based automation that can automatically place modeled elements in real-time to the correct workset. Workset Configurations can also prevent modeled elements from being placed on the incorrect worksets.
With the desired workset selected, a new rule can be created by clicking the New button under the Rules section of Workset Configurations.
When a new rule is created, different types of conditions can be added:
These rules can be used to automatically assign elements onto the workset as they are placed or after the fact using the Run all rules button. Elements will be assigned to a workset if they meet the criteria for at least one of the created rules. Rules can be created with either Category or Parameter based components. The example below could be used for exterior walls.

Click Run all rules to manually apply all rules under the selected workset. When workset rules are ran manually, a Workset Rules Report prompt will be displayed:

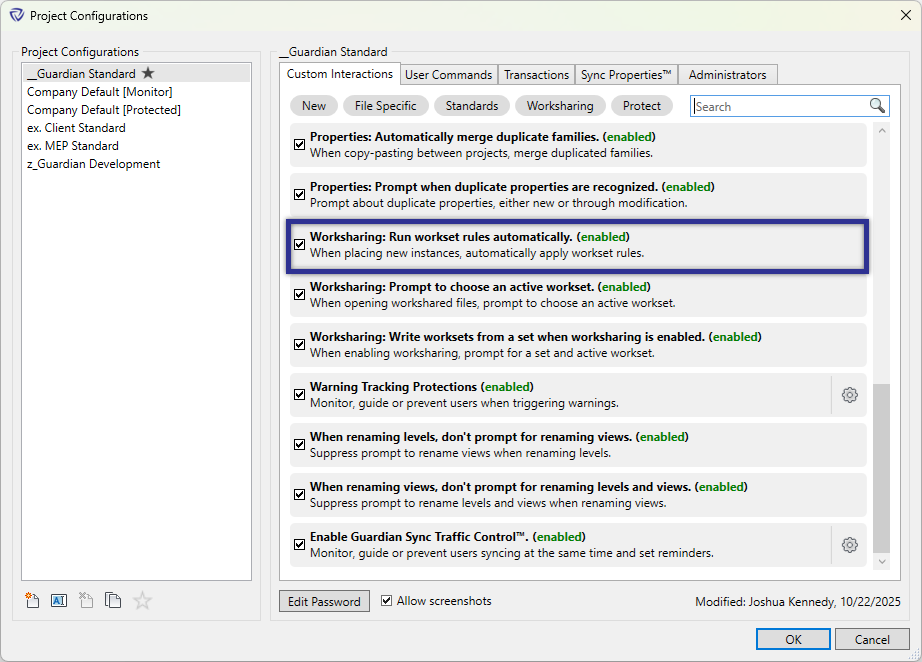
To run the rules automatically, check Worksharing: Run workset rules automatically under Project Configurations, or File Overrides for a specific project.
Within Workset Configurations, enable Run rules automatically when new instances are added for each workset rule to turn on automations on a workset-by-workset basis.
Please note, the Workset Configuration must be assigned to the active project model and the individual workset must have the green check for the automation of workset rules.
By selecting Only allow elements that match these rules, modeled elements placed on the active workset but don’t match the specified rules assigned for the workset will be prohibited from the active workset. When end-users attempt to place prohibited modeled elements onto the active workset, a dialog will be displayed and offer the end-user to select a different workset. This will also set the selected workset to be the active workset. This only activates when the element being placed isn’t governed by another workset rule.
Proper workset management starts with having the correct workset active. Workset Configurations will prompt end-users to select the active workset prior to completing the opening of a workshared enabled project model.
Please note, the prompt will automatically close in two minutes if no workset is selected. The workset as typically set by Revit will be active.

To turn this feature on, under Project Configurations, or File Overrides for a given project model, check Worksharing: Prompt to choose an active workset.

When an end-user enables worksharing, Guardian will prompt them to select a Workset Configuration to be created from a list of configurations.

When Workset Rules are used to automatically place modeled elements onto the correct workset, the end-user will not be presented any prompts or dialogs. Guardian will perform the automations without any warning.
If an end-user attempts to place prohibited modeled elements onto the active workset, a dialog will be displayed and prompt the end-user to select a different workset.

For workshared enabled project models, Guardian will prompt end users to select the active workset upon opening.
Contact our support team to receive personalized assistance.
