December 5, 2025
Guardian 3.3 opens the door to a new generation of intelligence and control. This release strengthens everything you rely on, making Guardian smarter, faster, and more connected across your projects and teams. From project visibility to new firm wide protections, every improvement is designed to give you greater clarity, consistency, and confidence in how your models are managed.
Across this cycle, our development team delivered hundreds of tasks, fixes, and refinements, far more than we could possibly list here, working through a fast moving, highly iterative environment to bring this release to life. We also extend a sincere thank you to our beta users. Your real-world feedback directly shaped many enhancements and resolved issues that will benefit everyone using this release.
Thank you for helping guide Guardian’s evolution. With each release, we move closer to a seamless, more connected Revit experience built on stability, transparency, and thoughtful control.
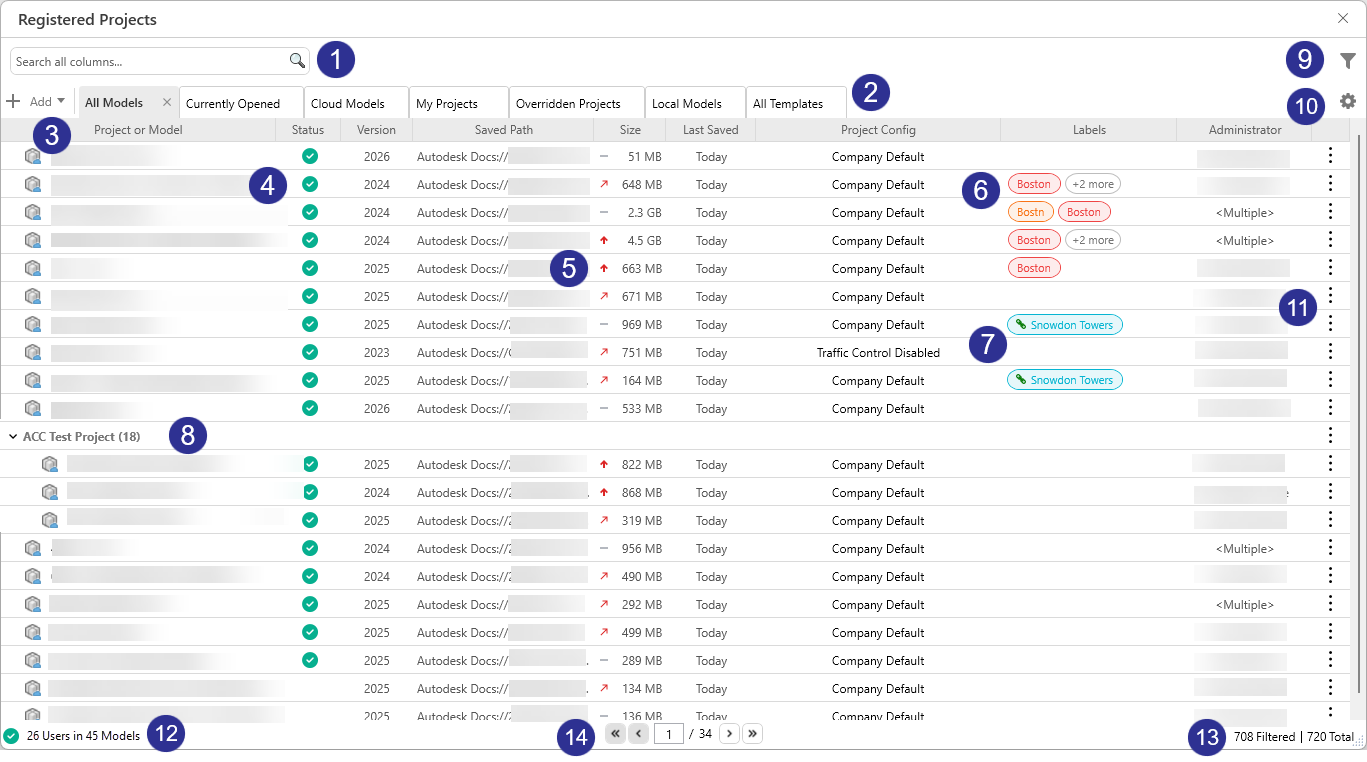
Registered Projects has been rebuilt to give teams faster insight, cleaner organization, and a clearer view of model performance. The new experience makes it easier to find what you need, understand activity across projects, and take action.
With a modernized layout, smarter defaults, and more intuitive navigation, teams can scan activity, monitor trends, and stay organized with far less effort. Performance is smoother, information is clearer, and both Company and Project Admins gain a more dependable view of standards across every project.
1. The Search Bar makes it easy to find what you need quickly. You can search across any column, names, paths, groups, admins, and more. Multi-term search lets you combine keywords across fields, giving you a fast, flexible way to surface the exact models you’re looking for.
2. Several new tabs are available right out of the box. Alongside All Models and All Templates, you’ll now see tabs for Currently Opened, Cloud Models, My Projects (models you administer), Overridden Projects, and Local (C:\) Models, each filtered to surface key model data instantly.
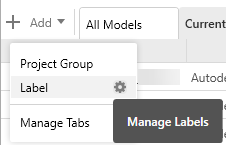
3. The Add dropdown brings key setup tools together. Teams can quickly create or manage Project Groups, add Labels, Manage Tabs or access Manage Labels for deeper configuration. Company Admins handle label management, while Project Admins can still create labels on the fly.
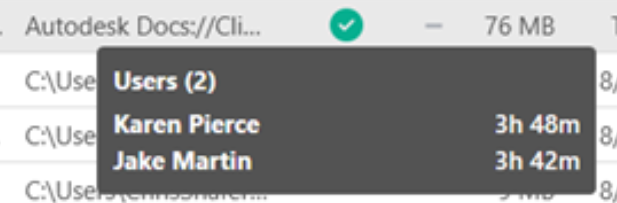
4. A new Status column highlights which models are currently open. Hovering over the icon shows who’s in the model and for how long, giving BIM managers immediate insight into project activity and helping teams coordinate more effectively.
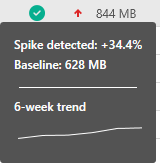
5. Models now show Trend Indicators next to the file size to reveal whether a model is growing or shrinking. Hovering shows how much the size has changed and the rolling six-week average, making it easier to spot unusual growth and catch performance issues early.
6. You can now quickly add labels to any project to keep things organized. Clicking a label instantly applies it as a filter, giving you a focused view of matching models and making it easier to track work across teams and project types.
7. Parameter driven labels can only come from project metadata and cannot be added or removed manually. They update automatically as parameters change, keeping labels accurate, searchable, and consistent without any manual steps.
8. ACC models now group automatically based on their ACC Project Name, reducing manual setup and keeping related models organized from the moment they’re registered. This helps teams maintain cleaner project structures and ensures ACC-hosted work is easier to track at scale.
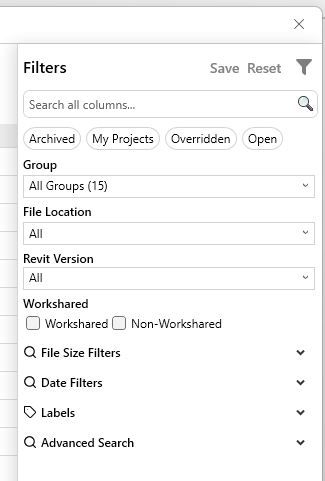
9. The new Filter Panel brings all project filtering into one organized place, with quick date options, file-size trend filters, and clearer controls across groups, locations, versions, and labels. Any filter combination can be saved when creating custom tabs, giving you repeatable views tailored to your workflows. Guardian-provided tabs stay locked so they always reflect their intended defaults.
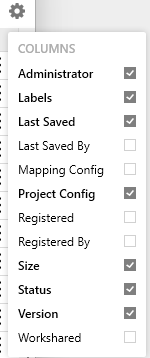
10. The gear icon lets you choose which columns appear on any tab, including Guardian provided ones. While you can’t reorder columns from this menu, you can drag and drop column headers directly in the dialog to create the layout you prefer.
11. The kebab menu gives you quick access to actions for both models and groups, and the same options are available through right-click. It’s an easy way to edit Labels, send Messages, open Project Central, and more.
12. Live counts of users across all open models are now displayed, giving you a quick snapshot of user and project activity.
13. You can now see your total number of registered projects alongside your filtered results, making it easy to compare the full dataset with the narrowed view and understand exactly how much your applied search or filters are refining the list.
14. Pagination replaces the old infinite scroll, eliminating long load times and constant fetching. Models now load in clear, predictable pages, making it faster and smoother to navigate large project lists.

New confirmation dialogs have been added to Registered Projects whenever users archive or unregister models. These actions can be performed at the model level and the Project Group level. Unregistered models will retain their data for 90 days before being permanently deleted.
Guardian now relies on the ACC Project ID and Hub rather than project name and path, creating a more stable foundation and reducing the likelihood of duplicated registrations across environments.
We’ve also removed the Guardian specific GUID from Project Information, avoiding duplicate registrations when users transfer project standards with Project Information selected. You may still see Project Information briefly owned by a user during registration. This is expected and helps avoid overlapping registrations when multiple people open the file at the same time.
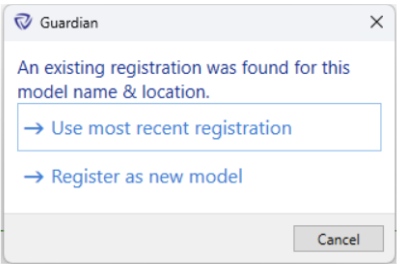
Lastly, to improve accuracy as models move or evolve, Guardian now captures the Saved Path, Name, and Creation GUID. If a model is renamed or relocated but the Creation GUID remains the same, Guardian will no longer create a new registration. Instead, users may be prompted to either Use Most Recent Registration or Register as New Model, giving clearer control and preventing accidental duplicates.
Built into Registered Projects, the new Label Manager gives Company Admins endless flexibility to organize projects using both quick-add labels and automated, metadata-driven labels. Quick-add labels make it easy to group projects by discipline, QA status, region, or any firm-specific workflow without relying on Revit data.
But where the Label Manager really shines is in automated metadata mapping. By linking a Label Category to a shared parameter, Guardian can generate and maintain labels automatically from project information such as template version, project phase, or other firm-defined attributes. This ensures consistent, accurate classification across all registered models with minimal effort.
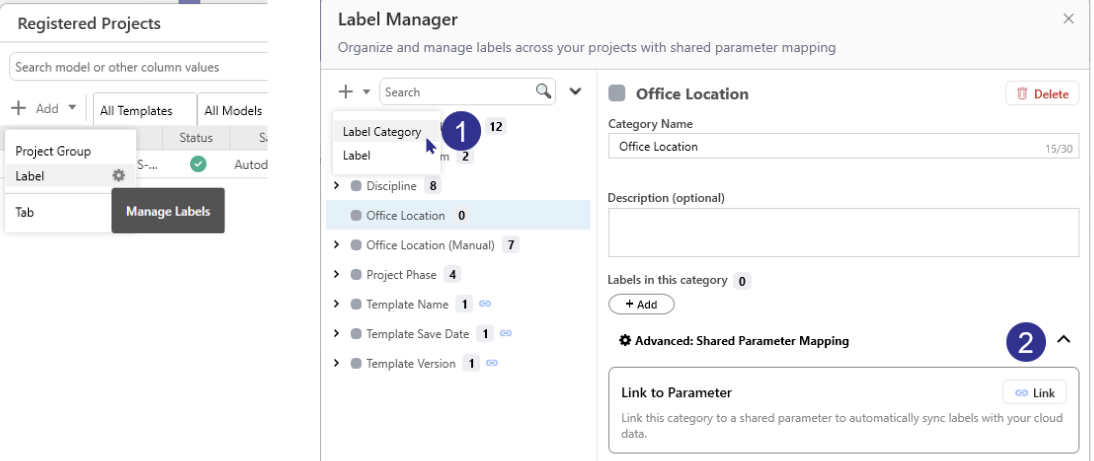
1. From the Add dropdown in Registered Projects, Company Admins can open Manage Labels to create and edit categories and labels. A gear icon appears when you hover on the right side of Label, giving you access to the Label Manager. Each Label Category can include multiple labels, helping teams group projects by discipline, phase, region, or other firm-specific standards.
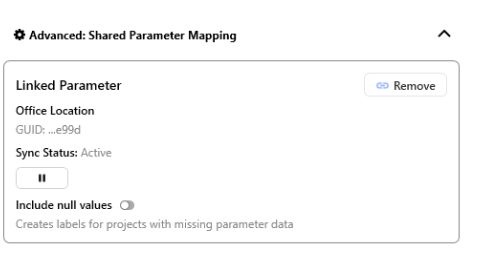
Tip: Once linked, syncing can be paused at any time. You can also choose toa create labels even when a parameter value is empty, making it easy to spot projects missing required information.

2. Link categories to text-based shared parameters to automatically generate labels from Revit project data such as template version, project phase, or any firm-defined field. To enable this, the shared parameter must be synced with Guardian and added to Project Information in your Revit model. Once connected, Guardian updates these labels automatically, ensuring consistent and accurate project metadata.
Guardian User Commands can now be expanded to include nearly any Revit command supported by the Revit API. Company Administrators can choose from hundreds of options, like Wall, Area Plan, or Check Spelling, and tailor their behavior to firm standards. Previously hard coded settings, including screenshots, data capture, and Command Messages, are also now fully configurable.

1. Email alerts are also now available whenever users add comments on protections through a User Command or Custom Interaction, giving administrators timely visibility without checking Backstage.
2. The Manage Commands button appears only for Company Administrators and opens the full list of supported API commands in Project Configurations.
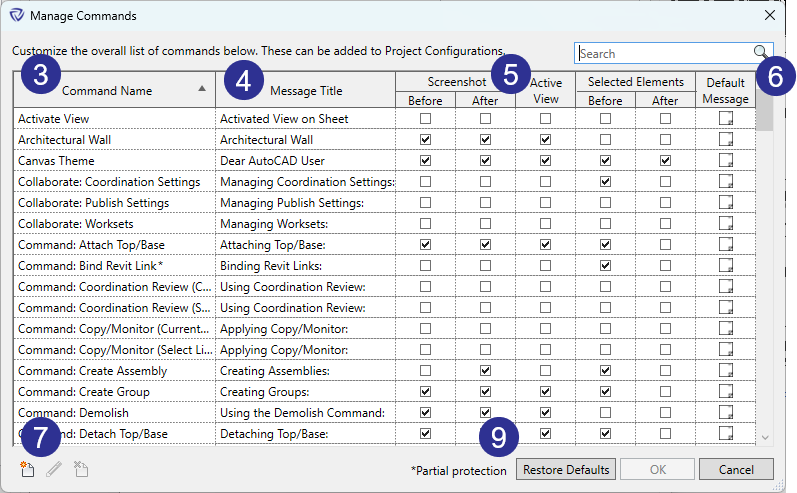
3-6. Within Manage Commands, administrators can rename commands, adjust message titles, choose whether to capture screenshots or selected elements, and set the Command Message.
7. Clicking New in the Manage Commands dialog opens the Add/Edit Command window. Enter a Command Name and Message Title that align with your standards, as this information is included in published activity data.
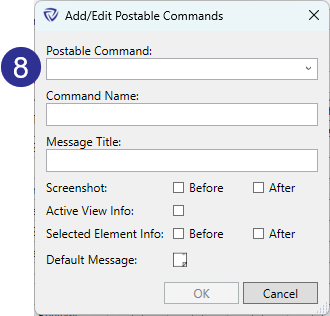
8. Postable Command is the Revit identifier for the command. Once added, it cannot be modified.
9. Restore Defaults: This will open a dialog which allows reverting any of these commands back to your Guardian default state.
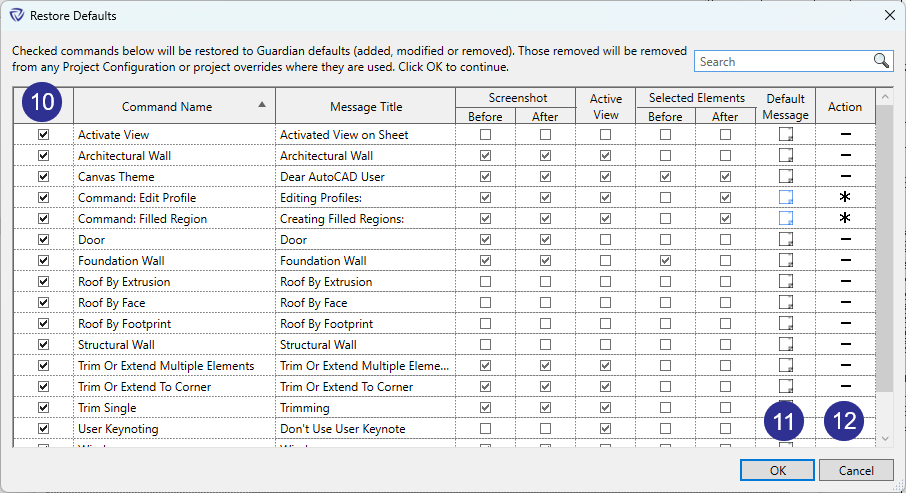
10. In the Restore Defaults dialog, each command that has been modified away from Guardian defaults will appear. If the command is checked in this column, it will be reverted.
11. Cells that show their contents in blue indicate where the difference is, if any.
12. The Action column indicates what will happen. The * (asterisk) means the command is in both places but the contents are different. The change will be reverted. The - (minus) means the command is not in the Guardian defaults, so the command will be removed from the company list.
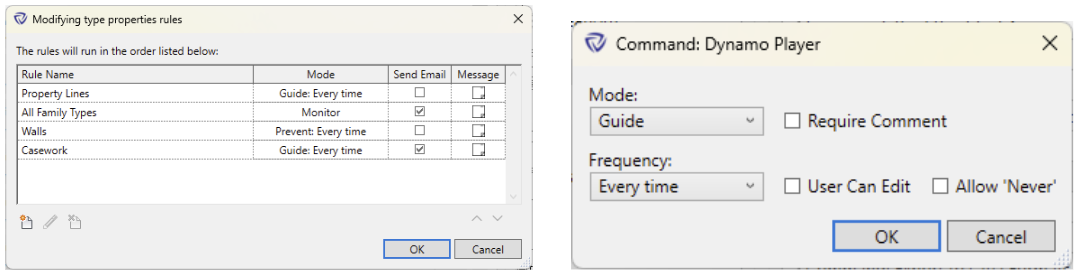
Guardian’s latest release strengthens your firm’s ability to enforce consistent standards across Revit. The Protection Mode dialog is now consistent everywhere it appears, giving administrators a predictable way to Guide, Monitor, or Prevent user behavior across all supported elements.
Building on this foundation, new rule-based protections now cover more of Revit elements that define how models look, behave, and communicate. Each rule follows a unified structure: conditions evaluate from top to bottom, support both AND and OR logic, and use the same Mode and Frequency controls. This creates a streamlined configuration experience across User Commands, rule-based Custom Interactions, and any future protection types.
Revit’s flexibility is one of its greatest strengths, but it can also lead to inconsistency. Family Type Protections in Guardian help your firm maintain visual and data standards by keeping critical system and loadable family types intact and used as intended.
From text and dimension styles to wall and MEP system types, these elements define your firm’s standards and visual language. Guardian now safeguards them all.
With Family Type Protections, administrators can:
By protecting what makes your Revit models uniquely yours, Family Type Protections help maintain quality and consistency across every project.
There are two ways to apply Family Types Protections:
Selected protected types can be applied to any loadable or system family type in the active model. When applied within a firm’s project template, those protections automatically carry into all future projects created from that template and remain in place if the family type is copied into another project.
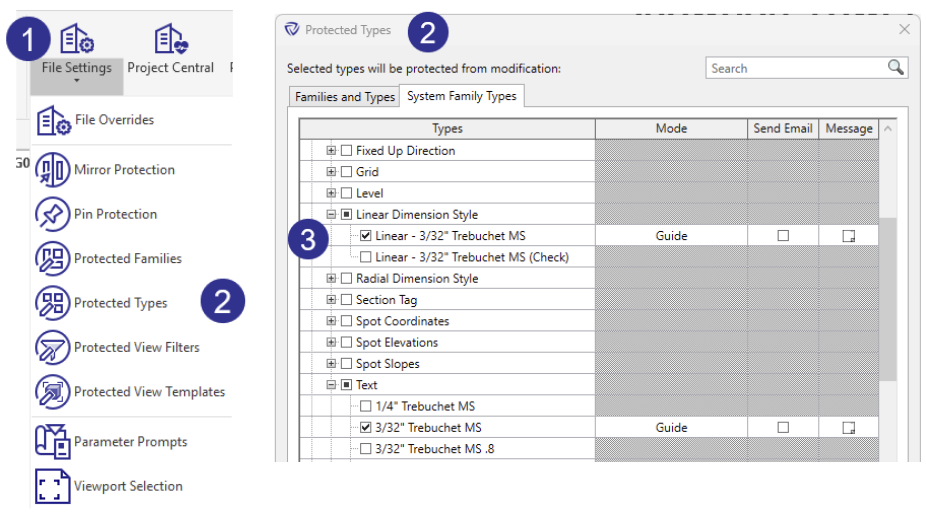
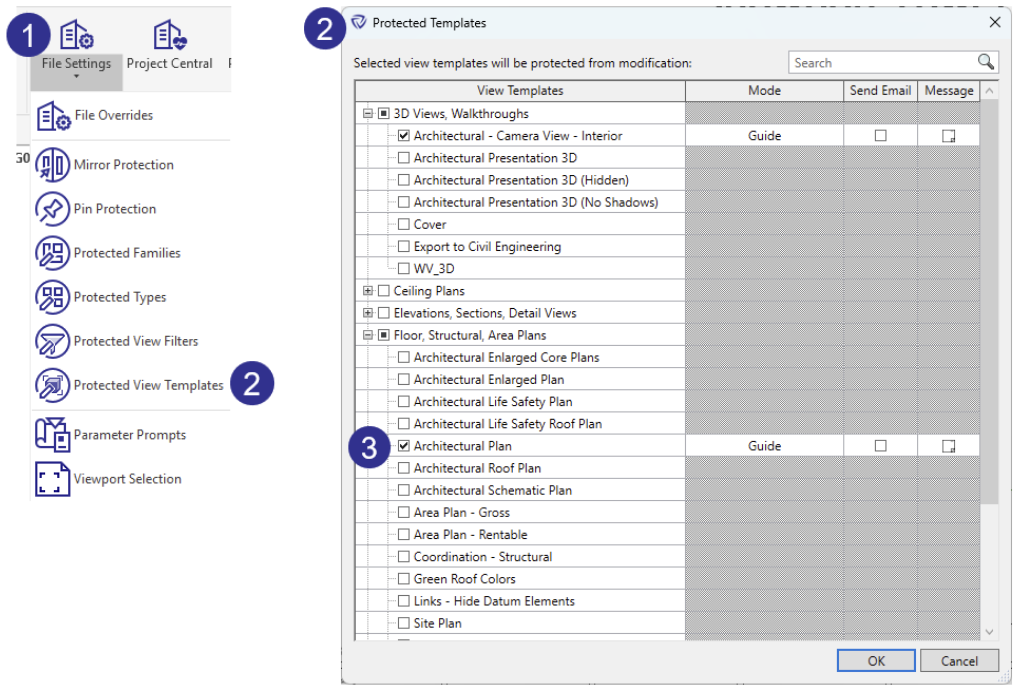
1. The File Settings dropdown lets you choose which elements to protect on a case-by-case basis. Once protected, their Guardian properties carry forward and apply automatically if those elements appear in other projects.
2. Selecting Protected Types opens a dialog with dedicated tabs for family and system family types, all within a searchable view.
3. Expand categories to apply protections at the family or type level. You can also select the Revit category to batch select all elements within it. Set Mode, Send Email, and Message options directly in the table for faster, consistent configuration.

1. To apply rule-based protections to your Revit family types, open Project Configurations. Rule-based settings let you enforce firm standards automatically by targeting specific family categories, family names, and more, so protections stay consistent and predictable.
2. Family Type Protections rules run from top to bottom until a matching condition is met. Each rule can include multiple AND and OR conditions, giving you precise control over how protections apply across family types. The protection mode can also be set per rule, allowing critical types to be fully protected while others are monitored.
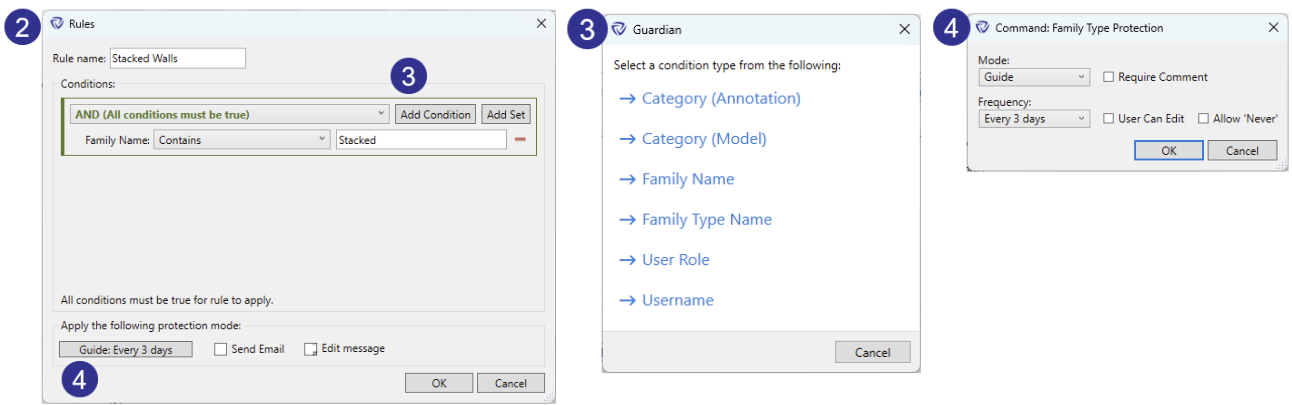
3. A wide range of conditions can be used to define rules, including Annotation and Model Categories, Family Name, Family Type Name, User Role, and Username.
4. The new standardized Protection Mode dialog is used across all protections. Mode, Frequency, comment requirements, and more are now managed in a cleaner, consistent configuration dialog.
Revit’s View Filters are powerful tools for controlling visibility and graphics, but that same flexibility can create inconsistencies across projects. View Filter Protections in Guardian help your firm maintain visual standards by keeping critical filters intact, applied correctly, and used as intended.
From discipline-specific filters to firm-approved graphic conventions, View Filters shape how teams interpret drawings and coordinate across models. Guardian ensures these filters stay reliable and aligned with your standards.
With View Filter Protections, administrators can:
By reinforcing the filters that drive your firm’s visual language, View Filter Protections help maintain clarity, quality, and consistency across every project.
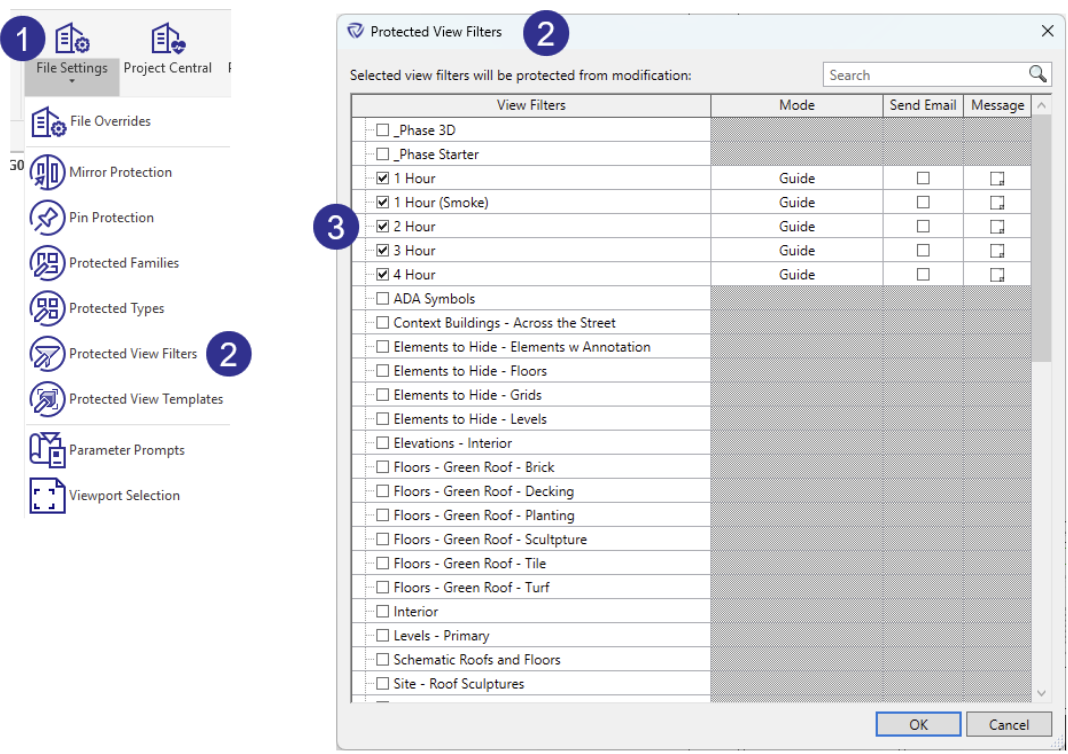
As with other protections, there are two ways to apply View Filter Protections:
Apply protections directly to filters in the active model. When added to a firm’s project template, these protections automatically carry into all future projects created from that template and remain in place if the filters are copied into another project.

1. To configure rule-based protections for view filters, open Project Configurations. These settings let you reinforce firm-approved visibility and graphic standards by controlling how specific filters are edited or applied across your projects.
2. Rules are evaluated in order, allowing you to prioritize which filters receive stricter protection.
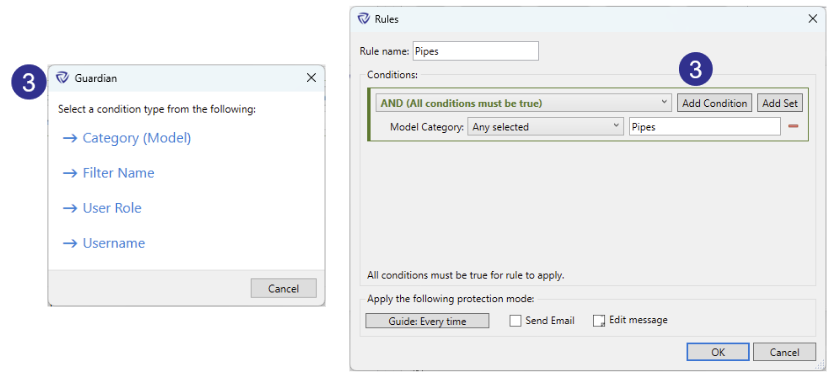
3. Available conditions include Model Category, Filter Name, User Role, and Username, allowing you to target the filters that matter most while also ensuring only the appropriate users can modify them.
With so many ways to control visibility and graphics in Revit, managing how teams apply and modify View Templates can quickly become complex. View Template Protections in Guardian brings clarity and consistency back to your projects.
View Templates are key to maintaining a unified visual standard, yet they’re often misunderstood, misused, or overwritten. Guardian ensures your firm’s approved templates stay protected while guiding users toward the correct ones for each view.
With View Template Protections, administrators can:
By combining intelligent safeguards with in-context guidance, View Template Protections helps teams maintain visual consistency across every drawing and every project.
There are two ways in which the View Template Protections can be activated:
These can be applied to any view template in the active model. When applied within a firm’s project template, those protections automatically carry into all future projects created from that template and remain in place if the view template is copied into another project.

1. To configure rule-based protections for view templates, open Project Configurations. These settings let you reinforce firm-approved visual standards by controlling how specific templates are edited across your projects.
2. Like all of our rule-based protections, View Template Protections run top to bottom. Protection Mode can be set per rule, allowing critical elements to be fully protected while others are simply monitored.
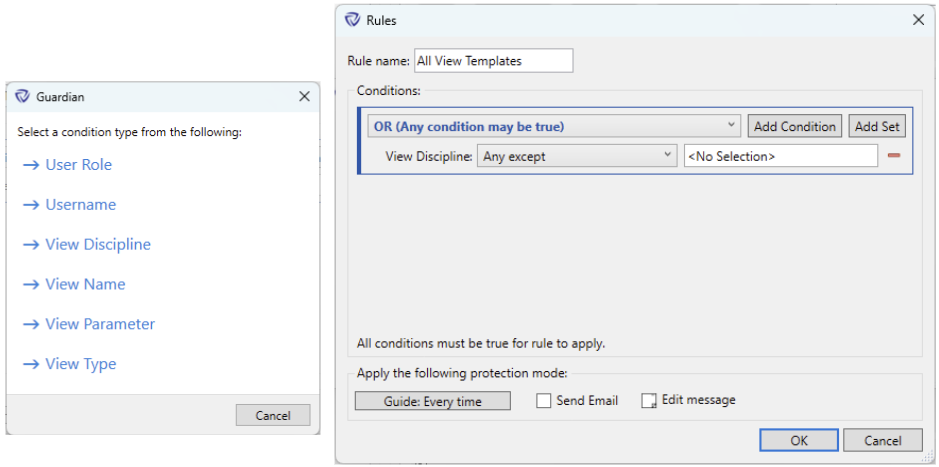
3. Conditions include User Role, Username, View Discipline, View Name, View Parameter, and View Type. Use View Discipline to target specific Revit disciplines, or View Name and View Type to protect chosen templates. View Parameter applies protections based on assigned parameters, while User Role and Username target specific users or restrict access for non-administrators.
Monitoring Revit warnings with Warnings Tracking has been expanded with two new columns: Mode and Messages, enabling Warnings Tracking Protections. Admins can now set protections that guide or prevent actions before warnings occur, while also controlling how frequently reminders appear.

1. Within the Mode table, admins can now define both the response level (Monitor, Guide, or Prevent) and the frequency of reminders for each warning, all within a single, streamlined dialog. This provides precise control over how often users are prompted while ensuring firm standards are consistently applied.
2. The Messages column lets teams communicate context directly to users, turning warnings into teachable, proactive moments.
3. When a Warnings Tracking Protection is triggered, the Guardian prompt now appears before Revit’s own warning. In Guide, selecting OK allows the Revit warning to appear and the user can continue. In Prevent, or when the user selects Cancel, the Revit warning still appears, but the only option is to cancel, and the original action is undone.

Teams often forget to pin Revit models when linking, which can lead to accidental shifts, broken references, and downstream coordination issues. A new Pin Protection is now available that, when enabled, will prompt users to pin as soon as they link Revit models, helping projects stay consistent and reducing cleanup work later.
1. Within Company Settings, we’ve added six new company-level commands to help you continue shaping and enforcing firm-wide standards. These commands apply to all user interactions, regardless of the model being used, and can be fully customized to match your organization’s workflows.
Each command can be adjusted by choosing the protection mode (Monitor, Guide, or Prevent) and building a custom Command Message for users who trigger it.
This list now includes the following commands:
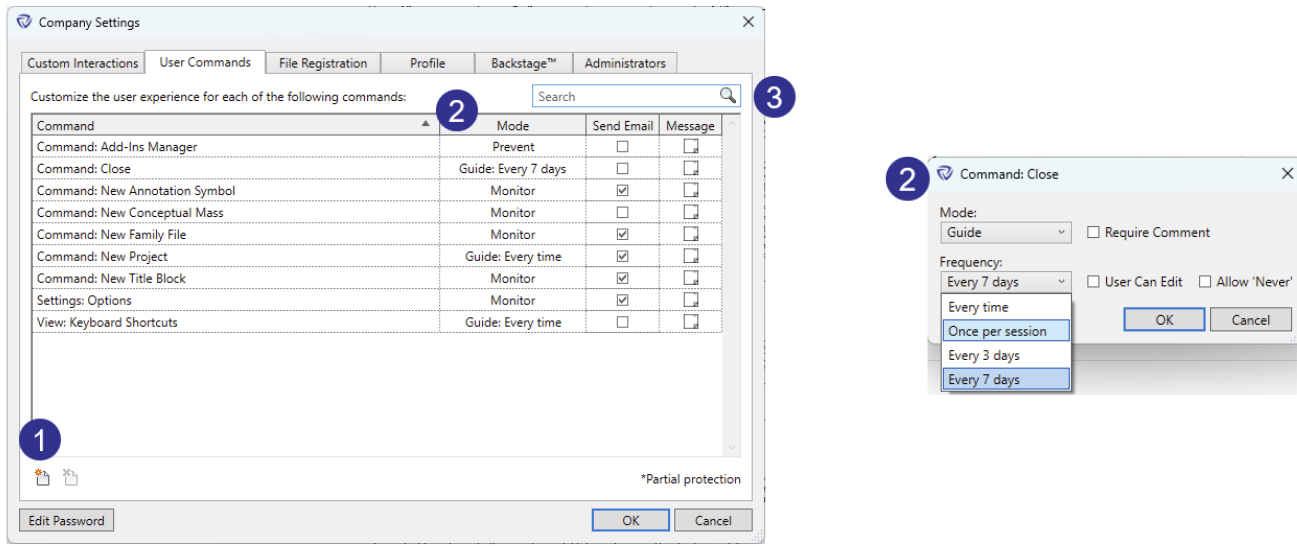
2. Frequency controls introduced in 3.2 for User Commands in Project Configurations are now available in Company Settings.
For any command set to Guide or Prevent, you can choose how often reminders surface for users in the Mode column: Every Time (default), Once per session, Every 3 days, or Every 7 days. This helps teams balance visibility and efficiency, keeping users aligned with firm standards without unnecessary interruptions.
3. To streamline navigation and make settings easier to manage, the search experience used in Project Configuration for User Commands and Custom Interactions is now available within Company Settings as well. This brings a unified, predictable search pattern across Guardian, helping administrators find commands and rules more quickly without scanning through long lists.
All dropdown menus are now alphabetically sorted for English language customers, making options easier to scan and select. Customers using other languages may notice slight shifts in ordering based on local sorting rules.
.png)
The About dialog includes an Ideas & Roadmap link for quick access to submit any feature requests and view our product roadmap, giving teams a clearer path to share ideas and stay informed about what's coming next.
A dedicated Help section has been added to the Guardian panel in the Revit ribbon, giving users quick access to our YouTube channel, online Knowledge Base, and a direct link to email support.
Rules defined by the Workset Configurations for RVT Links now ensure visibility across both the Instance and Type Worksets within the Revit link properties.
Property Lines now support Model Category rules in Workset Configurations and rule-based Custom Interactions, allowing teams to Monitor and Guide changes to these elements with the same clarity and control used across other protected Revit elements.
We've added some new capabilities in the service itself to handle larger batch workloads and tasks. It should result in better, more consistent performance for all users.
We'd love to learn more about your challenges and explore a more proactive solution.
